The ADLAM Pluto typically connects to your PC using a USB micro connector. When connected it establishes a virtual Ethernet network to allow your computer to connect to the device over TCP/IP. It also presents a USB storage device to allow you to edit config files. I’ve only come across one other device that does this, which was a Beaglebone Black Single Board Computer (SBC). This makes it very easy to connect, configure and use the ADLAM Pluto.
However USB cables are not typically long enough to reach the top of the tower or the back of ones dish. One trick the ADLAM Pluto has up it’s sleeve is the USB OTG support, meaning it can be both a USB peripheral and host device. This means we can connect a USB Ethernet adapter to the ADLAM Pluto and gain a real Ethernet interface, perfect for long cable runs !
Adding Ethernet
From the ADLAM Pluto University the OTG page lists a small number of USB Ethernet chipsets the stock firmware is compatible with. I wanted to use Gigabit Ethernet so went looking for an adapter that used the Realtek RTL8153 chipset. The device I ended up purchasing was a Waveshare USB 3.2 Gen1 Gigabit Ethernet Converter, from Amazon.
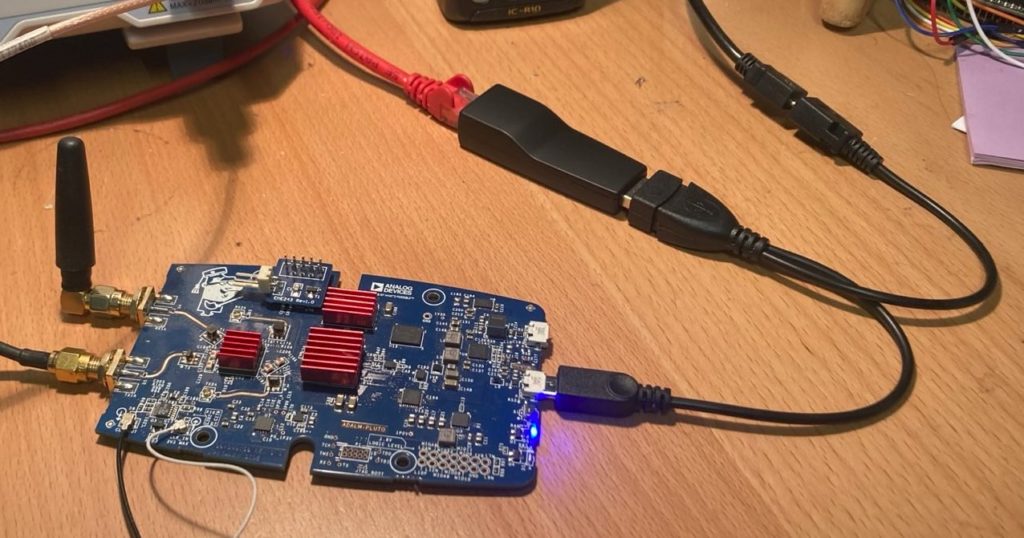
From various forums it was noted that the onboard ADLAM Pluto power supplies did not like feeding both the USB OTG Ethernet devices and the board at the same time. Instead a short “in-line” loom should be used, which I also purchased. You can see in the photo below how the USB “in-line” loom, Waveshare USB Ethernet and Pluto USB OTG port have been connected together. In this picture power was supplied from the PC (top right) but the data pins from the PC are not connected to either the Waveshare USB Ethernet or ADLAM Pluto. This works quite well.

Ethernet Configuration
To edit the configuration files we need to plug the ADLAM Pluto into the PC and edit the “config.txt” file on the USB storage device it presents. The ADLAM Pluto stock firmware can configure the Ethernet with a static or dynamic IP. I prefer to use a static IP in preference to running some form of DHCP/Zeroconf networking, YMMV.
Static IP Address
To configure a Static IP address edit the the following lines like so;
[USB_ETHERNET]
ipaddr_eth = 192.168.73.10
netmask_eth = 255.255.255.0
You will need to change your Ethernet address and Subnet mask to suit your own network, in which your PC will need to also be connected. If you intend to operate your ADLAM remotely via a VPN or similar, then you’ll need to add the default gateway as well like so;
[USB_ETHERNET]
ipaddr_eth = 192.168.73.10
netmask_eth = 255.255.255.0
gateway_eth = 192.168.73.1
Make sure when you have finished editing the config.txt file that you save the contents and then “eject” the ADLAM Pluto to ensure it commits it to internal flash.
Dynamic IP Address
To configure a Dynamic IP, simply leave the “config.txt” configuration files like this;
[USB_ETHERNET]
ipaddr_eth =
netmask_eth = 255.255.255.0
The ADLAM Pluto will then use DHCP to obtain an IP address when ipaddr_eth is left black, using this configuration is OK provided you have both DHCP and Zeroconf configured on your network like Avahi.
SDR Software
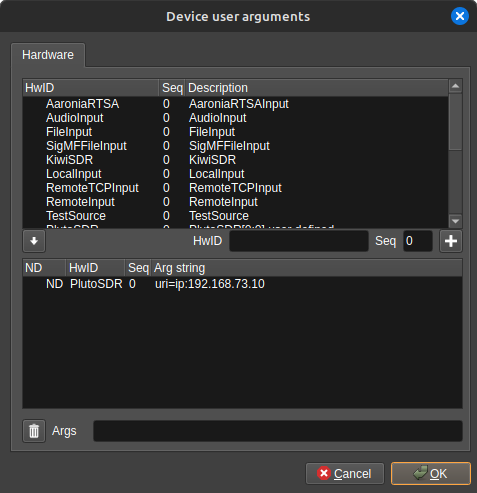
Don’t forget to reconfigure your SDR software with the new Ethernet Configuration, this can result in a short period of head scratching. For SDRangel I simply edited the device user arguments like so;

Enjoy !
