Display a PNG Image on small 128×128 OLED LCD

Now that my small OLED display automatically loads the device drivers on boot, it was time to see if I could display an image on my new frame buffer device.

To start with I went looking for a very basic graphics library that would allow me to experiment on frame buffer devices. There is certainly no shortage of libraries to choose from. The library that I settled on was the “Lightweight C 2D graphics API agnostic library with parallelism support” written by grz0zrg. It had both PNG and JPG routines that could output to a simple frame buffer device, being written in C was also a winner.

Flicking through the various examples the quickstart.c file seemed to have nearly everything I needed to display a PNG file on my OLED. Not so long ago a fellow AREG club member shot me some icon files for our club website; one of these icons was 512×512 pixels in size which made it an excellent candidate for shrinking to 128×128 pixels and using it on my OLED.

Downloading the library was as easy as;

$ cd ~
$ git clone https://github.com/grz0zrg/fbg

If you don’t have git installed use the relevant apt-get command. The example files can then be found in the following directory;

$ cd ~/fbg/examples 

I then copied the quickstart.c file and hacked on it a little, modifying it like so;

#include <sys/stat.h>
#include <stdio.h>
#include <signal.h>
#include "fbgraphics.h"

int file_exists( const char* filename )
{
    //define file handle
    FILE *file;

    //attempt to open file read only
    if( (file = fopen(filename, "r")) )
    {
        fclose(file);    // release file handle
        return 1;        // tell someone we found it
    }
    else
    {
        return 0;         //no one home
    }
}

int main(int argc, char* argv[])
{
    const char* framebuffer_name = "/dev/fb1";
    const char* logo_filename = "logo.png";

    //check we have a framebuffer to talk to
    struct _fbg *fbg = fbg_setup( (char *)framebuffer_name, 0);
    if (fbg == NULL)
    {
        return -1;
    }

    // make sure logo file exists
    if( !file_exists( logo_filename ))
    {
        printf("File not found: %s\r\n",logo_filename);
        return -2;
    }

    //draw something on the display
    struct _fbg_img *logo = fbg_loadPNG(fbg, "logo.png");
    fbg_clear(fbg, 0);
    fbg_image(fbg, logo, 0, 0);
    fbg_flip(fbg);
    fbg_draw(fbg);

    //release memory
    fbg_freeImage(logo);
    fbg_close(fbg);

    return 0;
}

Which was built with the following command line from within the examples directory;

gcc ../src/lodepng/lodepng.c ../src/nanojpeg/nanojpeg.c ../src/fbgraphics.c display_logo.c -I ../src/ -I. -std=c11 -pedantic -D_GNU_SOURCE -D_POSIX_SOURCE -Wno-unused-value -Wno-unknown-pragmas -O2 -Wall -lm -o display_logo

Hacking upon the Makefile is also not that difficult, I simply added the relevant lines the SRC and OUT sections, then copied the quickstart section and renamed display_logo. There is lots of information about on how to do this on the internet so I’ll not repeat it again unnecessarily.

All I had to do then was place my 128×128 PNG file alongside the display_logo executable (renamed logo.png) and run it… wallah ! I was greeted by the AREG logo on my small OLED display in all of its 128×128 pixel glory; see the image at the top of this post.

So the next trick is to move this to the boot process… So by the looks the plymouth package might be the go, only one way to find out.

Starting a fbtft_device on Boot

After having woken up my small 128×128 OLED display I was wondering how to get it to start automatically each time my rPi booted rather than having to log in and run the commands manually.

It turns out this is rather easy and just required me to edit two files. I’m also glad that these Waveshare OLED displays are effectively compatible with the Freetronics OLED 128×128 graphics display. A big thanks to the Freetronics team for making this driver available for SED1351 chip sets.

So I created the following file with my favourite editor (as root) /etc/modprobe.d/fbtft.conf with the following contents;

options fbtft_device name=freetronicsoled128

What this effectively does is tell the system how to configure the fbtft_device as it boots, much like if we started it with modprobe from the command line i.e used the following command;

sudo modprobe fbtft_device name=freetronicsoled128

So now the system knows how to configure the driver, we need to tell modprobe to load it by placing an entry in the /etc/modules file. So using your favourite editor (as root) edit /etc/modprobe and append the last two lines.

# /etc/modules: kernel modules to load at boot time.
#
# This file contains the names of kernel modules that should be loaded
# at boot time, one per line. Lines beginning with "#" are ignored.

i2c-dev
spi-bcm2835
fbtft_device

It appears that the SPI bus is a little slow to load if it’s called as a dependency of fbtft_device, which is a classic chicken and egg driver problem. So by starting it manually we make sure it’s available by the time the fbtft driver tries to do anything.

The i2c-dev entry in the same file fires up the i2c bus and was already pre-configured in my system by raspi-config way back when. I’m using it in my project, YMMV. All that is left to do is test it, so reboot and login and run the following command;

$dmesg | grep graphics

We should see something like the following;

[6.128978] graphics fb1: fb_ssd1351 frame buffer, 128x128, 32 KiB video memory, 4 KiB buffer memory, fps=20, spi0.0 at 20 MHz

That tells us that the little OLED display has registered as /dev/fb1 and that it’s ready to go. You can use the con2fbmap trick in my last post to test it’s working.

Now to work out how to get it to throw up an image on boot…

Small OLED Display on a rPi

Recently I was searching for a small graphic display that I could connect to a Raspberry Pi and fit within a Phoenix DIN enclosure I wanted to use.

There isn’t much space in the front of the enclosure I wanted to use, but a small 128×128 OLED colour display seemed it might fit.

Trawling through eBay I found what I thought to be a suitable unit and simply placed an order. There was very little information on the eBay site to tell me which display I had purchased so I just waited. When the display arrived it turned out to be a Waveshare SKU:14747 with the SED1351 controller.

A little searching around the web and I found an excellent tutorial written by the Freetronics Team for their 128×128 OLED display. It turns out our displays share the same SED1351 controller, so it was the logical place to start with my small display.

First task was to map the OLED pins to my rPi 3B+ 40-pin GPIO connector. On the rear of the display the pins and their desired function were clearly marked, so I mapped the pins like so;

OLED    | rPi      (pin)
--------+----------------
+5      | 5V       (1)
GND     | 0V       (3)
MOSI    | SPI_MOSI (19)
SCK     | SPI_SCK  (23)
CS      | SPI_CE0  (24)
DC      | GPIO25   (22)
RST     | GPIO24   (18)

I have also included the rPi pin numbers I used, make sure you plug the display into the right pins if in doubt RTFM. Once it was wired I ran the following commands to make sure the rPi was absolutely up to date;

sudo apt-get update
sudo apt-get dist-upgrade
sudo reboot

The latest version of Raspbian Lite I was using (Buster) came with the fbtft frame buffer drivers already installed, so these steps were unnecessary. Since this Raspbian installation was fairly recent I decided that I didn’t need to update the rPi firmware using the rpi-update command like in other tutorials; YMMV.

I had already enabled the SPI bus on my Pi when I was coming to grips with the I2C bus. I found the tutorial at Sparkfun a really good reference and easy to follow. To create the frame buffer for the OLED device I ran the following command;

sudo modprove fbtft_device name=freetronicsoled128
dmesg | tail -20

Fingers crossed we see the following output in our terminal;

fbtft: module is from the staging directory, the quality is unknown, you have been warned.
fbtft_device: module is from the staging directory, the quality is unknown, you have been warned.
spidev spi0.0: spidev spi0.0 125000kHz 8 bits mode=0x00
spidev spi0.1: spidev spi0.1 125000kHz 8 bits mode=0x00
bcm2708_fb soc:fb: soc:fb id=-1 pdata? no
spidev spi0.0: Deleting spi0.0
fbtft_device: GPIOS used by 'freetronicsoled128':
fbtft_device: 'reset' = GPIO24
fbtft_device: 'dc' = GPIO25
spidev spi0.1: spidev spi0.1 125000kHz 8 bits mode=0x00
spi spi0.0: fb_ssd1351 spi0.0 20000kHz 8 bits mode=0x00
fb_ssd1351: module is from the staging directory, the quality is unknown, you have been warned.
graphics fb1: fb_ssd1351 frame buffer, 128x128, 32 KiB video memory, 4 KiB buffer memory, fps=20, spi0.0 at 20 MHz

The output here shows us that the SPI bus is OK and that we now have a frame buffer /dev/fb1 that is expecting to find a SED1351 LCD controller. So now it was time to display something so I used following command;

con2fbmap 1 1

And here is what I see;

w00t it works ! Now it’s time to go and find some graphics libraries that can talk to this frame buffer device… and to work out how to display text in boxes that is wider than 80 columns in WordPress…

MQTT Paho C Library

One of my upcoming “Radio” projects involves MQTT running on a raspberry Pi. I’m more familiar with C than I am with Python so to talk to the MQTT broker I went looking for a C based client.

I eventually settled on the Eclipse Paho MQTT C Client library, however it doesn’t come with an ARM based Linux binary package like you get for all the python peeps. Instead you’ve got to compile this from source, I guess since I’m intending to use C in the first place I should be OK. So back to the command line.

Starting with a bone stock installation of Raspbian Buster Lite I simply used the following commands in a shell;

$ sudo apt-get install git libssl-dev doxygen graphviz
$ cd /tmp
$ git clone https://github.com/eclipse/paho.mqtt.c
$ cd paho.mqtt.c/
$ make
$ make html 
$ sudo make install
$ cd /tmp
$ rm -rf paho.mqtt.c

I found all of the commands above in the git repository README.md file. One thing I noticed was when compiling the libssl-dev library generated a good many “deprecated” warnings about old TLS ciphers being used (ie TLS 1.1, 1.2, 1.3 and SSL 2.0 & 3.0) so if you’re intending to use these it might be best to dig a little further. In my case this wasn’t important so I’ve filed it away here as a note to self for future reference.

So now it was just a question if the library works, the simplest way to do this was to compile the included examples and see if they work. So back off to the command line we go.

Eclipse Mosquitto on a rPi

For a while now I’ve been meaning to investigate the Message Queuing Telemetry Transport protocol or MQTT as it’s more commonly known. While the protocol is nearly 20 years old it has become increasingly popular with the Internet of Things (IoT).

The original MQTT code was donated by IBM and Eurotech to the Eclipse Paho project more than 10 years ago now and since then has been extended and massaged into what is known as Mosquitto today. I also like that Eclipse have done a lot of work writing clients for a great many platforms making the developers job just that much easier. A few of my friends have used it professionally so it comes recommended and seems like a good place to start.

So I wanted to experiment with this on a Raspberry Pi (there is a plan more on this later!), so after a bit of googling I found a nice guide written by Adafruit (click) that was the basis of what I used to setup my MQTT stack.

The following is what I needed to do to install Mosquitto on a stock installation of Raspbian Buster Lite. The Mosquitto package is available pre-compiled for ARM in the Debian repo’s so that makes life much easier;

$ sudo apt-get install mosquitto mosquitto-clients
$ cd /etc/mosquitto/conf.d/
$ pico mosquitto.conf

Once pico has created thew mosquitto.conf file then copy the following configuration into it;

# Config file for mosquitto
#
# See mosquitto.conf(5) for more information.

user mosquitto
max_queued_messages 200
message_size_limit 0
allow_zero_length_clientid true
allow_duplicate_messages false

listener 1883
autosave_interval 900
autosave_on_changes false
persistence true
persistence_file mosquitto.db
allow_anonymous true
password_file /etc/mosquitto/passwd

The configuration above is just a basic one for testing. It is by no means secure or ready for production systems, you have been warned. Once the config has been written the following two commands can be used to start Mosquitto and check it is actually running;

$ sudo systemctl start mosquitto.service
$ sudo systemctl status mosquitto.service 

There are small apps that can be used to throw data into the MQTT broker and create topics to publish and subscribe data to and from. Once I’ve worked this out for myself I’ll throw something here.

GPSd and the HP un2420

At a recent radio club technical night we ran through the setup of ntpd and GPSd for time syncing laptops. This is important when running modes like FT8 and JT65 where transmissions are synchronised to the nearest second, or for satellite tracking.
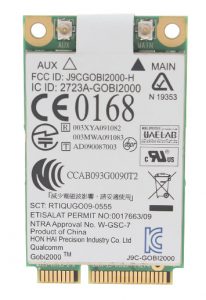
Picture of HP2420 Modem

During the tech night we used a external USB GPS, however my laptop has a HP un2420 broadband modem inside that includes a built in GPS. So after the tech night I decided to see if I could get GPSd to work with this module.

In a previous post I found that you could send a string to the last of three USB serial ports that this module creates [ttyUSB0-2], that would then activate the GPS functions within the module you can read this here (click).

So to use this module we need GPSd to send a “\$GPS_START” string to the GPS before it tries to use it. It also needs to send a “\$GPS_STOP” string to the GPS when GPSd stops.

It turns out GPSd has internal mechanisms to do this via a device-hook that you can find in the man page, however there aren’t many examples of “how” to do this on the internet.

The device hook file is nothing more than a simple bash script that is called by GPSd as it starts or stops the GPSd service. It will call this bash script using two parameters, the first is the name of the device, the second is the action required i.e.”activated” or “deactivated”. So all we need is a basic script, there are probably more elegant ways to write this script than what I’ve used, but it works for me.

So using your favourite editor create the file below with the following contents;

/etc/gpsd/device-hook

#!/bin/bash
#
#device hook script to start and stop HP2420 internal GPS
#
if [ "$1" = "/dev/ttyUSB2" ] && [ "$2" = "ACTIVATE" ];
then
echo "\$GPS_START" > "/dev/ttyUSB2"
sleep 5
else
if [ "$1" = "/dev/ttyUSB2" ] && [ "$2" = "DEACTIVATE" ];
then
echo "\$GPS_STOP" > "/dev/ttyUSB2"
fi
fi

This script simply matches the USB serial device the HP un2420 creates with the word ACTIVATE and fires the magic string into the USB serial device and will return 0 to GPSd. The same happens when GPSd wishes to stop the GPS device. These internal GPS devices do not like starting then immediately stopping, it can bork the device to the point it requires the laptop to be rebooted. So to prevent this a short sleep delay has been added just after we activate the GPS. I could have equally added it after or before the STOP command, but this might not be a good idea as laptops have a tendency to hibernate and we would like the GPS to stop.

Now that we have our script we need to make sure it’s executable by GPSd. I found that if you start GPSd and don’t let it daemonise for debugging, it will tell you which user and group that it starts with, we just need to make our permissions match;

$ sudo gpsd -N -D3 -F /var/run/gpsd.sock /dev/ttyUSB2
gpsd:INFO: launching (Version 3.17)
gpsd:INFO: listening on port gpsd
gpsd:INFO: stashing device /dev/ttyUSB2 at slot 0
gpsd:INFO: running with effective group ID 20
gpsd:INFO: running with effective user ID 122

gpsd:INFO: startup at 2019-03-07T23:52:07.000Z (1552002727)

I’ve highlighted the two lines we’re looking for. We can go and match these ID numbers to the specific user and group in the /etc directory. If you press Ctrl-C then GPSd will stop. Looking at the ID’s on my laptop this was user ‘gpsd’ and group ‘dialout’, YMMV.

So now we can set the right owner and permissions for our device-hook file;

$ sudo chown root:dialout /etc/gpsd/device-hook
$ sudo chmod 750 /etc/gpsd/device-hook
$ ls
legend@HP-ProBook:/etc/gpsd$ ls -al
total 20
drwxr-xr-x   2 root root     4096 Mar  8 09:54 .
drwxr-xr-x 130 root root    12288 Mar  8 00:06 ..
-rwxr-x---   1 root dialout   280 Mar  8 09:54 device-hook

Basically owner is left as root and we’ve given read and execute permissions to group dialout. This will allow GPSd to read the file and only sudo users able to edit it.

So using the same command line as before start GPSd in a window. Now in a second window launch a client like cgps. In the GPSd window we should see something like this;

legend@HP-ProBook:$ sudo gpsd -N -D3 -F /var/run/gpsd.sock /dev/ttyUSB2
gpsd:INFO: launching (Version 3.17)
gpsd:INFO: listening on port gpsd
gpsd:INFO: stashing device /dev/ttyUSB2 at slot 0
gpsd:INFO: running with effective group ID 20
gpsd:INFO: running with effective user ID 122
gpsd:INFO: startup at 2019-03-07T23:52:07.000Z (1552002727)
gpsd:CLIENT: => client(0): {"class":"VERSION","release":"3.17","rev":"3.17","proto_major":3,"proto_minor":12}\x0d\x0a
gpsd:CLIENT: <= client(0): ?WATCH={"enable":true,"json":true};\x0a
gpsd:INFO: running /etc/gpsd/device-hook /dev/ttyUSB2 ACTIVATE
gpsd:INFO: /etc/gpsd/device-hook returned 0

gpsd:INFO: SER: opening GPS data source type 3 at '/dev/ttyUSB2'
gpsd:INFO: SER: speed 9600, 8N1
gpsd:INFO: attempting USB device enumeration.
gpsd:INFO: 8087:0020 (bus 2, device 2)
gpsd:INFO: 1d6b:0002 (bus 2, device 1)
gpsd:INFO: 05c8:0403 (bus 1, device 4)
gpsd:INFO: 03f0:251d (bus 1, device 8)
gpsd:INFO: 8087:0020 (bus 1, device 2)
gpsd:INFO: 1d6b:0002 (bus 1, device 1)
gpsd:INFO: vendor/product match with 091e:0003 not found
gpsd:INFO: SER: speed 9600, 8O1
gpsd:INFO: SER: speed 9600, 8N1
gpsd:INFO: gpsd_activate(2): activated GPS (fd 8)

< BIG SNIP>

^Cgpsd:WARN: received terminating signal 2.
gpsd:INFO: closing GPS=/dev/ttyUSB2 (8)
gpsd:INFO: running /etc/gpsd/device-hook /dev/ttyUSB2 DEACTIVATE
gpsd:INFO: /etc/gpsd/device-hook returned 0

gpsd:WARN: exiting.

The two lines we need to find I’ve highlighted above. Basically we want to see GPSd execute our script with a return value of 0 (success). I’ve snipped a sizeable amount of information out of the above window to make it more readable. You should also see where I’ve hit Ctrl-C which generates a warning to cgps that GPSd has shutdown, which is neat !

Ok so now we have GPSd starting and stopping the GPS device in my laptop correctly. However this is not the end of the story, laptops are able to be suspended so we need to take care of this as well. So using your favourite editor create/edit the following file;

/etc/pm/sleep.d/96_gpsd

#!/bin/bash
#
# what we want done with our GPS in the laptop
case "$1" in
hibernate)
#stop GPSd
systemctl stop gpsd.socket
systemctl stop gpsd
;;
suspend)
#stop GPSd
systemctl stop gpsd.socket
systemctl stop gpsd
;;
restart)
#restart GPSd
systemctl restart gpsd
;;
esac

Thankfully as soon as we tell GPSd to stop it calls /etc/gpsd/device-hook and DEACTIVATES the GPS module for us. Now we also need to set the permissions correctly;

legend@HP-ProBook:/etc/pm/sleep.d$ chmod 755 96_gpsd
legend@HP-ProBook:/etc/pm/sleep.d$ ls -al
total 20
drwxr-xr-x 2 root root 4096 Mar  8 11:09 .
drwxr-xr-x 3 root root 4096 Apr 27  2018 ..
-rwxr-xr-x 1 root root  273 Mar  8 11:09 96_gpsd

Testing of this script is as simple as calling it with the correct first parameter. Testing that our distros are calling this file is a little harder and may be the subject of yet another post. I’m thinking that I need to measure if there is a performance difference with the GPS running while hibernated or not, this sounds easy but will take many hours. Still pondering.

There we go, the internal GPS within the un2420 should now be available, it would be worth rebooting your machine to make sure everything is working well.


MoonSked and Ubuntu 18.04LTS

Recently I was indoctrinated into the world of 6m EME when a few club members and I decided to give it a try on something of a whim. With a bit of encouragement from Lance W7GJ we raided and cherry picked our way through a few fellow club members shacks and sheds and pieced together a “small” portable 6m EME station. You can read about the activation on our club website once it’s published (click). The picture below speaks volumes;

The moon at moon set (4am) with our 6m EME station – photo by Scott VK5TST

While looking at various Apps and trying to work out how this EME thing works, I discovered MoonSked written by David GM4JJJ.

At first glance it appeared to be a cross platform application that would help me plan and understand how this EME thing works without wasting too many late nights outside. What I liked most is I could run it on both Windows or Linux. My main computer in the shack still runs Windows (for reasons), however for laptop(s) and servers I prefer various flavours of Linux. So the installation of MoonSked on my main shack computer was straight forward, however things rapidly fell apart when I tried the same on my Laptop that runs Ubuntu 18.04LTS. I downloaded the zip file, placed it in my home directory and then tried to run it, sigh it didn’t work.

After a quick check of the website I noticed the last version of Ubuntu that MoonSked was built to run on was 9.10 (karmic koala) which went end of life years ago (2013). Being a binary distribution means recompiling and linking this against 64-bit libraries was not an option, sigh; we had to do this the old fashioned hard way.

So having grown up using Linux for more years than I’d care to admit I had a fair idea that this would be the classic “shared library dependency problem”. I wasn’t to be disappointed and even learnt a little about how the new linux multiarch (well new to me) system worked.

So the crux of the problem was MoonSked was compiled against 32-bit binary libraries and my Ubuntu 18.04LTS distro is entirely 64-bit. It is little wonder that MoonSked couldn’t run. So the place to start with any dependency problem is the infamous ‘ldd utility’. Let’s poke inside MoonSked and see what libraries are under the hood;

legend@HP-ShackBook:~/MoonSked$ ldd MoonSked
linux-gate.so.1 (0xf7f48000)
libgtk-x11-2.0.so.0 => not found
libgdk-x11-2.0.so.0 => not found
libgmodule-2.0.so.0 => not found
libglib-2.0.so.0 => not found
libgthread-2.0.so.0 => not found
libgobject-2.0.so.0 => not found
libgdk_pixbuf-2.0.so.0 => not found
libpango-1.0.so.0 => not found
libpangocairo-1.0.so.0 => not found
libpangoft2-1.0.so.0 => not found

libpthread.so.0 => /lib32/libpthread.so.0 (0xf7f07000)
libdl.so.2 => /lib32/libdl.so.2 (0xf7f02000)
libXi.so.6 => not found
libXext.so.6 => not found
libX11.so.6 => not found

libstdc++.so.6 => /usr/lib32/libstdc++.so.6 (0xf7d7c000)
libm.so.6 => /lib32/libm.so.6 (0xf7cb1000)
libgcc_s.so.1 => /usr/lib32/libgcc_s.so.1 (0xf7c93000)
libc.so.6 => /lib32/libc.so.6 (0xf7aba000)
/lib/ld-linux.so.2 (0xf7f4a000)
libcairo.so.2 => not found

Ok so there are a few libraries missing and thankfully I can see some of the lib32 libraries are being found. What is not immediately apparent is that 32-bit libraries can be installed separately and sit alongside the very same 64-bit libraries. The multiarch features of the latest linux kernel and GNU tools is what confuses MoonSked trying to find it’s libraries. So to get MoonSked we need to solve the shared library dependencies separately. So watch the following carefully.

We start by double checking that we are in fact running a full 64-bit system;

legend@HP-ShackBook:~/MoonSked$ uname -m
x86_64
legend@HP-ShackBook:~/MoonSked$ dpkg --print-architecture
amd64

Excellent the kernel is 64-bit and we are using the 64-bit package repository that should be linked against 64-bit libraries. Now we check the following;

expert@HP-ShackBook:~/MoonSked$ dpkg --print-foreign-architectures
i386

Ah Ha ! This is excellent as it means that we can install the 32-bit libraries with the dpkg/apt tools without having to configure dpkg. If you find that i386 isn’t defined as a foreign architecture you’ll need to use dpkg to enable it. There are plenty of websites on the net that can assist here (YMMV), Ubuntu 18.04LTS comes pre-configured for 32-bit and 64-bit multiarch out of the box.

So now we can simply use apt-get to install the dependencies. I simply use a process of elimination to work out what is missing. First I’d use apt-cache and the name of the shared lib to search for library names or resort to the internet, then I’d use apt-get to install it and then re-run ldd again to see the result. The following line works well when the output from ‘ldd’ gets more than a page or two;

$ ldd MoonSked | grep "not found"

This will basically print out any library dependency that was not found to the display. Slowly but surely you work your way through to the end of your list, making notes as you go for your blog (*grin*). Rather than document all of the above steps I’ll just give you the short list;

sudo apt-get install libc6:i386 libpango-1.0:i386 libcairo2:i386 libpangocairo-1.0:i386 libgtk2.0-0:i386 libcanberra-gtk-module:i386 libatk-adaptor:i386 gtk2-engines-murrine:i386 libdlm3:i386

Now the observant will notice at the end of each package is a colon and i386. This tells apt/dpkg to install the 32-bit library and not the default 64-bit package. Depending on what apps you have on your linux machine already some of these packages may already be installed and up to date. If you do find this is the case then simply drop the name off the list above and keep trying.

As I wrote at the very beginning of this post, these are the steps that worked for me on my Ubuntu 18.04LTS installation. I’m hoping that the process used to seek and destroy the missing dependencies makes sense it’s certainly not the only way to do it, works for me YMMV.

At least now I can fire up MoonSked on Ubuntu 18.04LTS and continue my 6m EME experiments. Thanks again to David GM4JJJ for writing MoonSked !

APRS iGate – Part 3 AX25 Config

Now that the Raspberry Pi is configured we can get back to the radio part again, so lets start with configuring the TNC.

Configure AX25 axports file

Before we can start any ax25 configuration we need to define the call signs and ports in the axports file;

$ sudo nano /etc/ax25/axports

edit the last line to look like this;

# /etc/ax25/axports
#
# The format of this file is:
# name callsign speed paclen window description
#
1 VK5ZM-5 19200 236 2 145.175MHz (1200 bps)

Don’t worry about all the speed, paclen and window values just yet, copy what you see below.  These values are as described in the TNC-Pi user manual.

Configure Kissattach

Now before the ax25 tools can use a TNC it has to be attached to the kernel.  We’ll do this using a utility called kissattach.  This utility will create the necessary ax0 networking interface, we’ll assume our TNC will use the Serial Port ttyAMA0.  Lets test that kissattach will start;

$ sudo kissattach /dev/ttyAMA0 1 10.1.1.1

One note make sure that the IP address passed to the ax0 port is not part of your LAN, it needs to be different !  If you want to be old school you can always throw this into the 44.xx.xx.xx IP address range that was reserved for Amateur use, you can find more details here.

If you dont see any error messages type the following command;

$ ifconfig

look for the following lines;

 ax0: flags=67<UP,BROADCAST,RUNNING> mtu 236
 inet 10.1.1.1 netmask 255.0.0.0 broadcast 10.255.255.255
 ax25 VK5ZM-5 txqueuelen 10 (AMPR AX.25)
 RX packets 0 bytes 0 (0.0 B)
 RX errors 0 dropped 0 overruns 0 frame 0
 TX packets 0 bytes 0 (0.0 B)
 TX errors 0 dropped 0 overruns 0 carrier 0 collisions 0

All going well we now have a working ax25 interfaces and most of the TNC configured.

Now we need to make sure kissattach is started after a reboot, so open the following file;

 $ sudo nano /etc/rc.local

We need to add the following lines somewhere near the bottom, I found that the maintainers of raspbian-stretch print the IP address to the console when the machine boots, so I added the following after this;

# starting ax0 interface using kissattach
if [ -x /usr/sbin/kissattach ]; then
  echo "Starting Kissattach: Binding port ax0"
  /usr/sbin/kissattach /dev/ttyAMA0 1 10.1.1.1
fi

You can test this by rebooting and then checking if the service was restarted, but we’ll need to edit this file again before the end of this post so hang tight for a minute !

AXListen

One of the more tricky aspects of configuring ax25 on linux is we must deal with is non-root access to the ax0 interface that we’ve just created.  On any Linux system you normally must have be root or use sudo to access any network interface.

So what we do is the same trick that admins do with the command ping and set the SUID permission bit on the axlisten file.  By setting this permission bit it will allow non-root users to execute this command as if they were root, without being granted any further root privileges.

$ sudo chmod 4755 /usr/bin/axlisten

now we can test it;

$ls -al /usr/biin/ax*
-rwxr-xr-x 1 root root 50836 Sep 20 2015 axcall
-rwxr-xr-x 1 root root 17516 Sep 15 2015 axgetput
-rwsr-xr-x 1 root root 43064 Sep 20 2015 axlisten

Depending on your shell you may find that the text “axlisten” is coloured with a red background.  If you look carefully at the user permission bits (highlighted above in bold) you should see that instead of an X for execute it has changed to an S for SUID.

Unless you have your TNC connected to a radio and channel traffic there is not much point in testing just yet, however if you do simply run;

$ axlisten -c

It can take time but you should see packets being decoded, the yellow LED on the tncpi will also light when a packet is decoded.

One thing I’ve noted (a of Feb 2018) is that axlisten has not been compiled with ncurses support in the latest Raspbian-stretch packages which means there is no colour support.  You will occasionally see “Could not initialize color support” (sic), wihch is annoying since raspbian-jessie works perfectly.  Hopefully the maintainers will fix this oversight at some point.  We can always compile ax25-tools from scratch, Charles K4GBB has an excellent tutorial and script here for those wishing to try this themselves.

Configure Mheard

The mheard daemon monitors the AX25 channels and records call signs that it hears along with some basic stats.   This can be handy for debugging RF issues and just generally gauging how well your node is working.  It’s much the same as the mheard function found in many packet TNC’s in the day.

To get mheard running we simply edit the rc.local file again;

$ sudo nano /etc/rc.local

Then add the following lines at the bottom of the file after where we start kissattach (see above);

# starting mheard daemon
if [ -x /usr/sbin/mheardd ]; then
  echo "Starting Mheard Daemon"
  /usr/sbin/mheardd
fi

Now is probably a good time to test that we will survive a reboot;

$ sudo reboot

Once the Pi has restarted use the following commands to see what happened;

$ ps -aux | grep mheard
root 2049 0.0 0.0 1908 120 ? S Feb17 0:00 mheardd
$ ps -aux | grep kiss
root 413 0.0 0.0 1908 108 ? S Feb17 0:00 /usr/sbin/kissattach /dev/ttyAMA0 1 10.1.1.1

The mheard command needs to monitor the AX25 channels for a little while before it starts recording information, here’s an example of it working.

$ mheard
Callsign Port Packets Last Heard
VK5ZM-7 1 11 Sun Feb 18 09:52:04

If the output remains blank then using axlisten make sure you’re hearing traffic and that the receive LED (yellow) is being illuminated as traffic is heard.   This needs to be working before mheard will start to do something.

Now we can get onto alignment of the radio and some further testing in the next instalment.

APRS iGate – Part 2 Pi Config

Bringing up a Raspberry Pi (rPi) is not difficult for anyone with some basic linux admin skills.  If you haven’t looked at the hardware I’m using you can read this back here in part 1.  The instructions below are the basics of what I’ve done for my rPi, yours will likely be different YMMV.

Prepare Raspbian

I downloaded the latest “lite” version of Raspbian from here at the time of writing that was Raspbian Stretch.  For an iGate you don’t really need all the graphics and bling, the command line is easy to use.

Once downloaded I extracted and wrote the image to an 8Gb SDCard using win32diskimager.   From there the card went in to the Pi and then let it boot with a screen and keyboard attached.   Watch carefully and make sure that the OS expands the image to fill your entire SDCard.

I’d suggest plugging the Pi into your network using the Ethernet adaptor to start with, this is somewhat easier to deal with than setting up the WiFi.

Update, Upgrade and Configure

Once the Pi has booted log in using the default pi user name and password, you can find this on the rPi website.  Once you’re logged in run the following commands;

#sudo apt-get update

Answer yes to any questions regarding increased disk usage.   This will bring your Pi up to date with all of the latest changes.  Now we’re ready to configure the Pi hardware, execute the following command;

#sudo raspi-config

This will bring up a ncurses menu in which you can configure your Pi.  I’d suggest the following changes are made;

  • Configure your WiFi in the network options menu
  • Configure your localisation options (locale, timezone and keyboard layout)
  • Configure the Interfaces
    • Enable SSH
    • Enable i2c
    • Enable Serial

Once you have finished then exit the raspi-config tool and reboot your Pi

Change the Default User

Personally I don’t use the Pi user account and prefer to create my own user.   I usually run the following commands;

#sudo adduser myuser

Where myuser is your preferred user name.  Follow the questions and when faced with the password don’t be tempted to make it an easy one, especially if you intend to allow external ssh.   If you fear loosing the password then look at Lastpass, there are others but I like Lastpass.

Now still using the pi user open the following file;

#sudo nano /etc/group

Working your way down the file every time you see a line that contains pi add your new users name.  This will then grant your new user the same privileges as the default pi user.  It’s really important you update this one;

sudo:x:27:pi,myuser

Again change “myuser” to your preferred user name and before anyone tries to hack my systems this isn’t the user name I use either (Duh!).   Once you’ve worked your way to the end of this file then save your changes, again google will help you here.

It’s time to test your new account, make sure that you can login and execute sudo commands before you go any further.

Open the following file in your favourite editor;

#sudo nano /etc/shadow

Did I mention I like nano ?  Now look for the line starting with pi, it will be long compared to the others in this file, between the first and second colon replace the text with an asterisk.  Pay careful attention while deleting that you don’t go too far !   It should end up looking something like this;

pi:*:17499:0:99999:7:::

The text between the first and second colon is a hash of the user password, replacing it with the asterisk disables this user from logging in from the console or ssh without deleting the user.  It means you can use the command;

#sudo su pi

to switch to the pi user should you ever need to in the future.


Firewall

Personally I don’t like running my Pi’s without some form of firewall.   Right now the firewall is not configured this will be done after the AX25 tools have been installed.  It is up to the reader if they decide to enable the firewall before allowing remote logins to the Pi.

WiFi & Bluetooth

The rPi-3 comes with WiFi and Bluetooth enabled.  I was pleasantly surprised to see both interfaces in the boot up sequence appear and be configured.   The Bluetooth interface does not present any security risks and it should be safe to leave this enabled.
I prefer to connect my rPi’s to Ethernet interfaces in preference to using WiFi.  I’d also like at some point to work out how to get the rPi to perhaps be a WiFi access point, meaning I can log into the machine locally.  That will certainly be a blog entry at some point in the future.  For the time being I’ve simply left the interface un-configured.  Both the Bluetooth and WiFi can be disabled by adding the lines shown to config.txt file in the boot directory;

#sudo nano /etc/config.txt

>> Add these lines to the bottom of config.txt <<
dtoverlay=pi3-disable-bt
dtoverlay=pi3-disable-wifi

Finished ?

Anyway the basic installation and configuration of the Pi is now complete.  Next we can concentrate on configuring the AX25 and iGate software, which I’ll continue in Part 3.

APRS iGate – Part 1 Hardware

In late 2012 I built my first receive only APRS iGate from a Raspberry Pi (rPi) and a Argent Data Tracker T2-301.   This has faithfully sat in a corner of my garage forwarding APRS packets to the internet all this time.  Drawing just shy of 1 watt in power, it doesn’t add any significant costs the household power bill.   I’ve been surprised just how reliable this setup has been and from time to time I even remember to login and check for security updates.

Since I built that first machine there’s been some nice developments in the world of rPi’s and AX25, so I thought I’d share the details of my latest APRS iGate project.

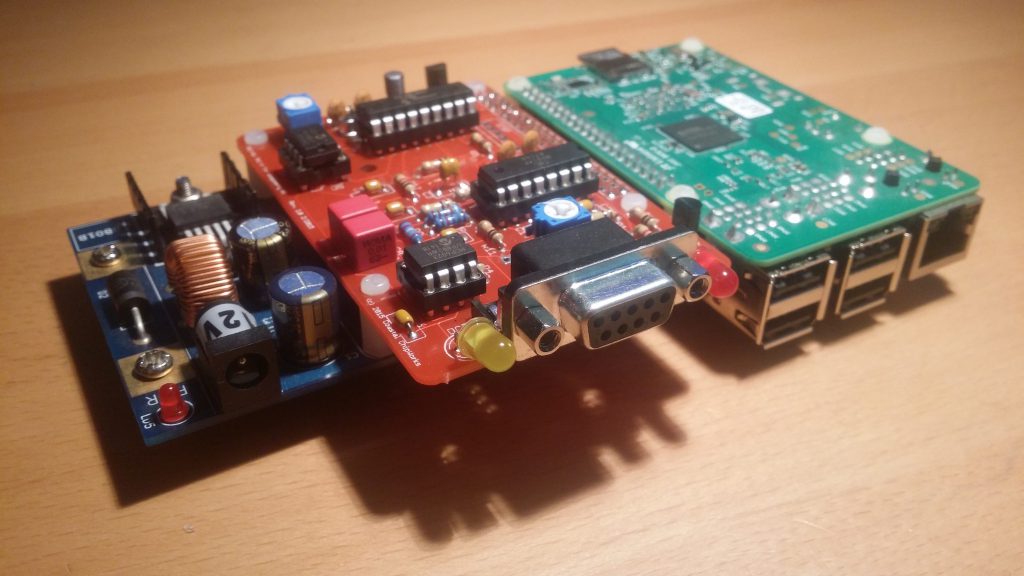
While searching for rPi power supplies I came across the BitScope Blade Uno which can power and hold a Model-B rPi and a HAT.   I was pondering one of these when it hit me that if you take this board, add a rPi and a Coastal ChipWorks TNCPi then I’d have a rather nice hardware platform on which to build a new APRS iGate  Even better is I can stuff it in a small 19″ rack mount case instead of sitting it on a shelf in the garage !.

So I just had to order the bits and wait the for the shipping.  Below is the hardware assembled, total cost just shy of A$150

I ordered the TNCPi as a kit and soldered it together in an hour or so, John W2FS’s kit is easy to build and the instructions are great.   I’ve also decided to use a Raspberry Pi 3 which includes on-board WiFi and Bluetooth.   With the hardware assembled then all we’ve got to do is configure it, which I’ll continue in Part 2.