HAB Telemetry – Initial Experiments

In a recent blog post I talked about finding some Pine A64 single board computers in a box and how this was the catalyst for my High Altitude Balloon (HAB) Telemetry experiments. In this post I continue describing the initial experiment with the Pine A64’s to test if they were capable of running the Project Horus software.

Pine A64 Operating System

So the choice of Linux operating system for the Pine A64 2GB SBC had grown substantially since the first time I experimented with these boards after the initial KickStarter campaign. After some trials and tribulations I settled on the DietPi distribution. This included a relatively modern kernel and a nifty installation and package management system, with a Debian based back-end. It is also highly optimised to run on small SBC’s, it only runs the bare minimum processes required and has logging to RAM enabled rather than to SDCard.

Setting up DietPi on this board was no different to any other ARM based SBC. Burning the image to SDCard, booting the device with a USB keyboard and monitor was straight forward. One nice part of DietPi is the setup and configuration is done within a Ncurses menu, similar to the raspberry Pi. So tuning and setting up the board just requires poking around these menus and configuring the hardware you want to use. Once done I found I was using just under 1GB of the 32GB SDCard I’d inserted, which included all of the GCC build tools I needed to compile programs from source. I was impressed.

Tracking Software and SDR’s

The first HAB tracking software I wanted to try was the Horus 4FSK binary telemetry. The Project Horus software team have done a great job documenting how to build and run this software in their GitHub wiki. The Horus guide recommends the RTL-SDR if you intend to run a Headless Raspberry Pi and I had a draw full of them left over from various projects. If you’re not familiar with these you can find them here, please be aware of fakes on eBay the frequency stability of these fakes typically results in tears. I’ve used the RTL-SDR V3 as pictured above.

It didn’t take me more than an hour to get this software running which included building the RTL-SDR software from source, editing the startup scripts and testing that dual 4FSK de-modulators were running. I was lucky to have a RS41 radio sonde that had been modified to generate this data mode, more detail can be found here. I was thankful that the DietPi distribution is very similar to the current Raspberry Pi platform, so all commands simply worked, those that didn’t required nothing more than installing the missing package or dependency and trying again.

Running both Horus 4FSK binary telemetry decoders on DietPi saw the system peak load get no higher than 0.6 (~15%), considering that the Pine A64 is a quad core 1.2GHz ARM, this is very lightly loaded. There is definitely more scope to add further functionality on this SBC.

So having cloned the SDCard just prior to installing the Horus 4FSK binary telemetry software, I then started again a fresh on the second Pine A64 and installed the Wenet software. Again the installation documentation for Wenet is excellent and I chose to go the Docker path rather than build from source. This time however the system peak load, rose to 1.6 and peaked no higher than 2.5 (~63%), meaning a single Docker Wenet decoder is about as much as I was confident loading this system with using a RTL-SDR.

Next Steps

So based on the above experiments, it was clear the Pine A64’s that spent the better part of 5 or more years languishing in my shed were more than capable of tracking HAB balloons and would finally be pressed into service.

As hinted within the Project Horus documentation there is more than just software required to track High Altitude Balloons. It was time to continue digging through that shed to find more treasures for this new project.

That however will need to wait for the next post, more to follow.

SDRangel Simple PTT plugin

In recent post I configured SDRangel to work with a ADLAM Pluto as part of my 23cm transceiver project. Having configured the receiver and transmitter I had a proof in concept working under Linux, but there was one feature missing, how could I imlement a Push to Talk (PTT) function/button ?

So it was back to the search engines and it didn’t take long to find that SDRangel has a “Simple PTT” plugin that can be configured to provide this functionality.

Simply clicking on the “add feature” button, selecting “Simple PTT” from the drop down box, I was greeted with a new widget to configure.

Configuration of this plug-in is straight forward. Select the RX Dev from the drop down box, in my case R0; then select the TX Dev from its drop down box, in my case T1. For the time being the RX to TX and TX to RX delays are OK, as I’m not using any external amplifiers or pre-amps. Then you must hit the “play” button in the top left of the Simple PTT screen to activate the plug-in, at which point pressing the PTT button will make the ADLAM Pluto do it’s thing.

Here’s where I’ve placed the Simple PTT plugin in my SDRangel screen for the time being (lower left). You can clearly see the PTT button sitting there waiting to be used.

At this time SDRangel cannot control the ADLAM Pluto GPIO from within this plug-in, but it may be possible to use the Analog Devices “iio” utilities and script this externally. There are two buttons “Rx-Tx-Cmd” and “Tx-Rx-Cmd” that can be linked to individual scripts, this is something I’ll need to investigate further; especially when I want to integrate this with the Pluto-Charon kit I’m intending to use.

That will however have to wait for a later post.

HAB Telemetry – Introduction

As with all of my projects, they typically start by finding a crucial piece of kit that then sparks a whole development. Back in late 2022 I was searching through my shed for something when I happened upon a box of Pine A64 single board computers, that I’d completely forgotten about.

These were purchased from a Kickstarter campaign when 64-bit ARM was in its infancy and 64-bit ARM Linux distributions were not common. These new machines were difficult to get going, which is likely why they ended up in the shed. Needless to say, that box was pulled from the shed and sat on a shelf in my office until inspiration struck… could I build them into a High Altitude Balloon (HAB) telemetry tracking system ?

I’ve been involved with the Project Horus High Altitude Ballooning (HAB) group since August of 2010, my first flight was Horus 7 where we watched it land at our feet just shy of Pinnaroo in the North Eastern region of South Australia. Fast forward some 15 or more years and I’m still out there tracking balloons, having retired from actively chasing after them a number of years ago.

Over time much of the software for tracking these balloons had been ported to various flavours of Python from the original implementations in Java. For better or worse it has meant that this custom tracking software has migrated towards running on small embedded ARM single board computers. In late 2022 I’d heard that some within the Project Horus community were tracking balloons with Raspberry Pi’s and SDR’s, so here was the catalyst for some inspiration and I started to wonder if my original Pine A64’s were up to the task ?

Over the Christmas break in 2023 I cobbled together my first ARM based system and I’ve been experimenting with my High Altitude Balloon Telemetry System ever since. This work has been done on and off, when ever I was able to catch a few hours or days. The main focus typically came a few weeks before an actual balloon launch. This series of blog posts will document what I’ve learnt and how I’ve gone about setting my system up to current time.

More to follow.

ADLAM Pluto USB Ethernet

The ADLAM Pluto typically connects to your PC using a USB micro connector. When connected it establishes a virtual Ethernet network to allow your computer to connect to the device over TCP/IP. It also presents a USB storage device to allow you to edit config files. I’ve only come across one other device that does this, which was a Beaglebone Black Single Board Computer (SBC). This makes it very easy to connect, configure and use the ADLAM Pluto.

However USB cables are not typically long enough to reach the top of the tower or the back of ones dish. One trick the ADLAM Pluto has up it’s sleeve is the USB OTG support, meaning it can be both a USB peripheral and host device. This means we can connect a USB Ethernet adapter to the ADLAM Pluto and gain a real Ethernet interface, perfect for long cable runs !

Adding Ethernet

From the ADLAM Pluto University the OTG page lists a small number of USB Ethernet chipsets the stock firmware is compatible with. I wanted to use Gigabit Ethernet so went looking for an adapter that used the Realtek RTL8153 chipset. The device I ended up purchasing was a Waveshare USB 3.2 Gen1 Gigabit Ethernet Converter, from Amazon.

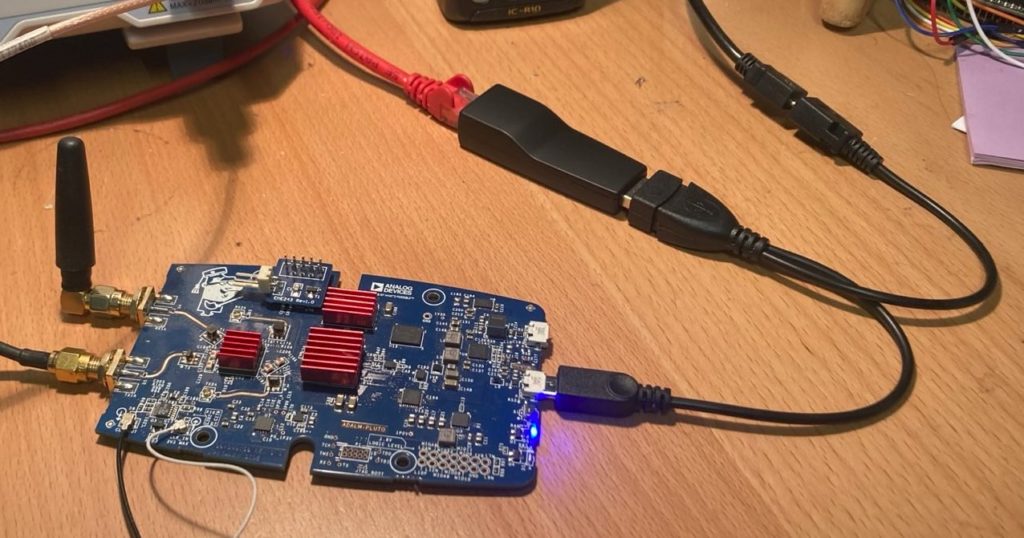
From various forums it was noted that the onboard ADLAM Pluto power supplies did not like feeding both the USB OTG Ethernet devices and the board at the same time. Instead a short “in-line” loom should be used, which I also purchased. You can see in the photo below how the USB “in-line” loom, Waveshare USB Ethernet and Pluto USB OTG port have been connected together. In this picture power was supplied from the PC (top right) but the data pins from the PC are not connected to either the Waveshare USB Ethernet or ADLAM Pluto. This works quite well.

Ethernet Configuration

To edit the configuration files we need to plug the ADLAM Pluto into the PC and edit the “config.txt” file on the USB storage device it presents. The ADLAM Pluto stock firmware can configure the Ethernet with a static or dynamic IP. I prefer to use a static IP in preference to running some form of DHCP/Zeroconf networking, YMMV.

Static IP Address

To configure a Static IP address edit the the following lines like so;

[USB_ETHERNET]
ipaddr_eth = 192.168.73.10
netmask_eth = 255.255.255.0

You will need to change your Ethernet address and Subnet mask to suit your own network, in which your PC will need to also be connected. If you intend to operate your ADLAM remotely via a VPN or similar, then you’ll need to add the default gateway as well like so;

[USB_ETHERNET]
ipaddr_eth = 192.168.73.10
netmask_eth = 255.255.255.0
gateway_eth = 192.168.73.1

Make sure when you have finished editing the config.txt file that you save the contents and then “eject” the ADLAM Pluto to ensure it commits it to internal flash.

Dynamic IP Address

To configure a Dynamic IP, simply leave the “config.txt” configuration files like this;

[USB_ETHERNET]
ipaddr_eth =
netmask_eth = 255.255.255.0

The ADLAM Pluto will then use DHCP to obtain an IP address when ipaddr_eth is left black, using this configuration is OK provided you have both DHCP and Zeroconf configured on your network like Avahi.
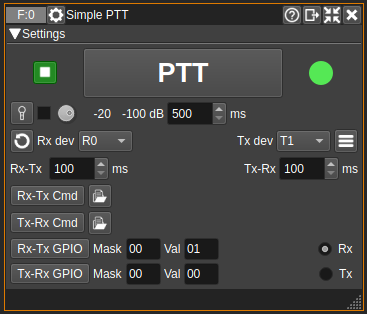
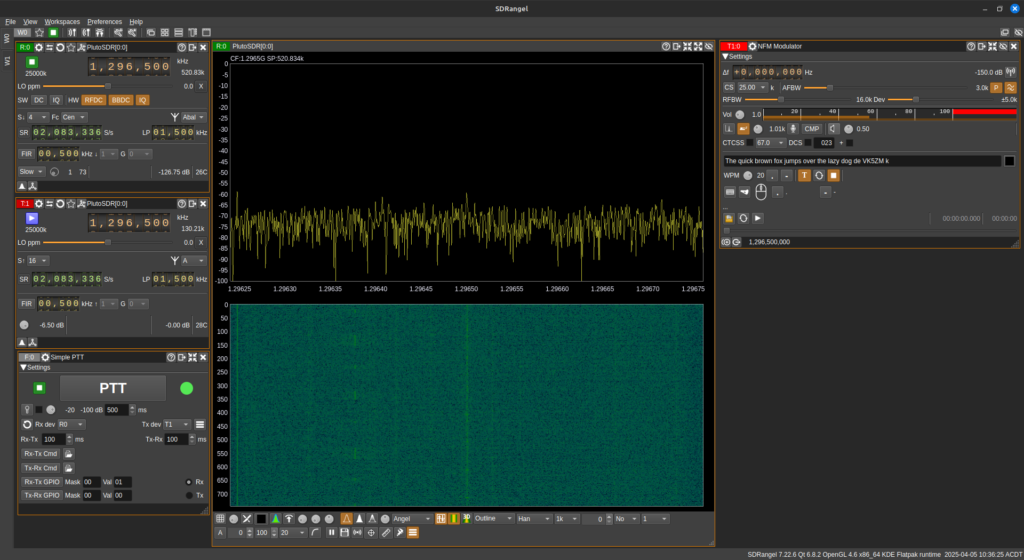
SDR Software

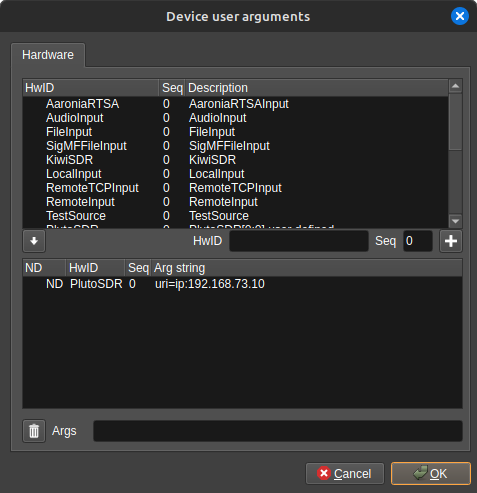
Don’t forget to reconfigure your SDR software with the new Ethernet Configuration, this can result in a short period of head scratching. For SDRangel I simply edited the device user arguments like so;

Enjoy !