The K3 that would “sometimes” not Transmit

There is nothing more frustrating than an intermittent fault that only presents itself at a contest or when you’re working rare DX. My Elecraft K3 has been doing just this on and off for the past three years and it’s been slowly driving me crazy.

My K3 had developed a nasty fault where it would refuse to make any RF when in transmit. You could hear the radio getting itself setup trying to transmit but no RF would appear at the output. The photo below is not my best effort it was however made very early in the morning with a mobile phone, but you should get the gist from the display;

What you see above is 0 Watts being reported, no SWR display with the TX LED lit. It certainly wont make any QSO’s like that.

So this wasn’t the first time I’d seen a fault similar to this. A year ago the LPA module failed after copping a static discharge in the antenna port from a dipole in a dry wind storm. With the help of Elecraft support this turned out to be nothing more than a small signal MOSFET that had failed on the LPA and was easily fixed. Well so I thought.

At the last OCDX contest in October 2018 the radio faulted again right at the start of the contest. So the station was quickly reconfigured and the radio removed from service. However once I returned home and turned the radio on, it powered up and transmitted as if nothing had happened. Damn this fault is now intermittent…

All that was left was to keep testing and wait for the radio to fail and catch it in the act. So after much angst I just couldn’t seem to make it fault with anything I could identify as a pattern. I’d do something and it would fault, power cycle it and it would work again; there was no consistency,. So I used every trick I’ve learnt to make radios fault, like;

  • pulling, pushing, prodding and re-seating every cable to see if there was a broken connection, more nothing.
  • pulling, cleaning and re-seating every board from the main board to dislodge oxide buildup, more nothing.
  • tighten and check all screws, long shot… more nothing
  • using a hot air-gun and freezer spray to see if something had become temperature dependant, nothing.
  • Double checking the wiring & build

So this afternoon the radio decided to fault and carry on faulting. Now was the time to get the covers off. Once done I noticed that the LED on the top of the KSYN3A would sometimes not light. Power cycle the radio and the LED would come back on, then power cycle it a few more times and it would stay off. The great part was when the LED was off the radio made no RF. Ah Ha, there is no such thing as a coincidence ! I’d finally caught this fault in the act.

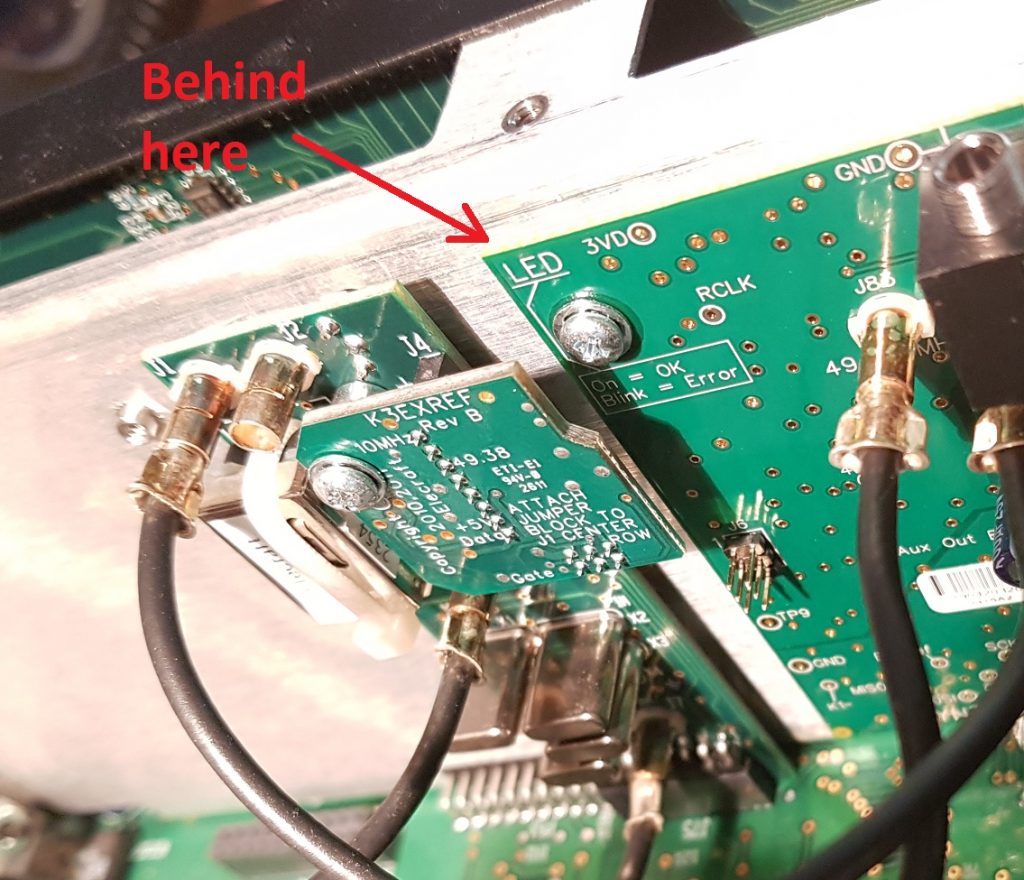
The KSYN3A is responsible for generating the Local Oscillators (LO) for transmit and receive, no LO and there can be no RF. Right that’s starting to make sense.

So now I could narrow down on the fault. From everything I had observed I had a suspicion that there was a problem with the output of the KREF3 board, either not providing the KSYN3A synthesiser with a signal or one that was out of spec. It was certainly a good place to start..

However before going much further I needed to check that the cabling between these modules was right.

I should also point out that my radio also has the K144XV 2m Transverter fitted, which is just to the right in the image above. It also has a reference locking kit. Hmmm, this immediately raised yet another red flag. Reading the K144XV reference locking kit manual I found the following wiring diagram;

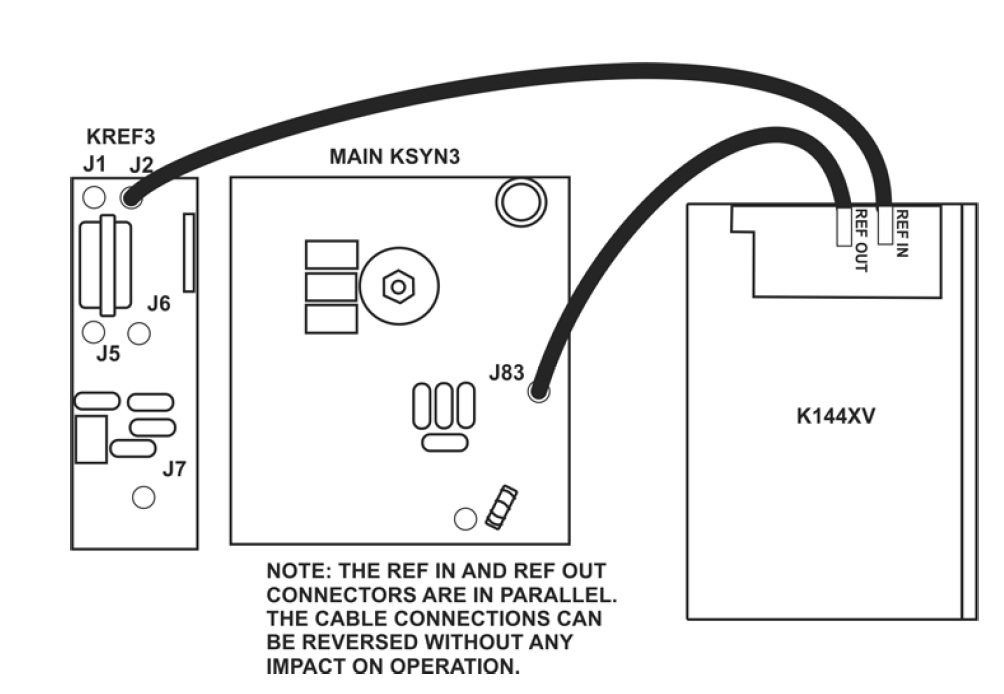
However this is not how I found my radio was configured. It instead had the K144XV REF_IN connected to J1 on KREF3 and J2 connected to the KSYN3A J83. Huh ?

Now looking carefully this wiring diagram I noticed it had KSYN3 not KSYN3A, so perhaps things are different if you use the new Synthesiser. Well here’s the wiring diagram;

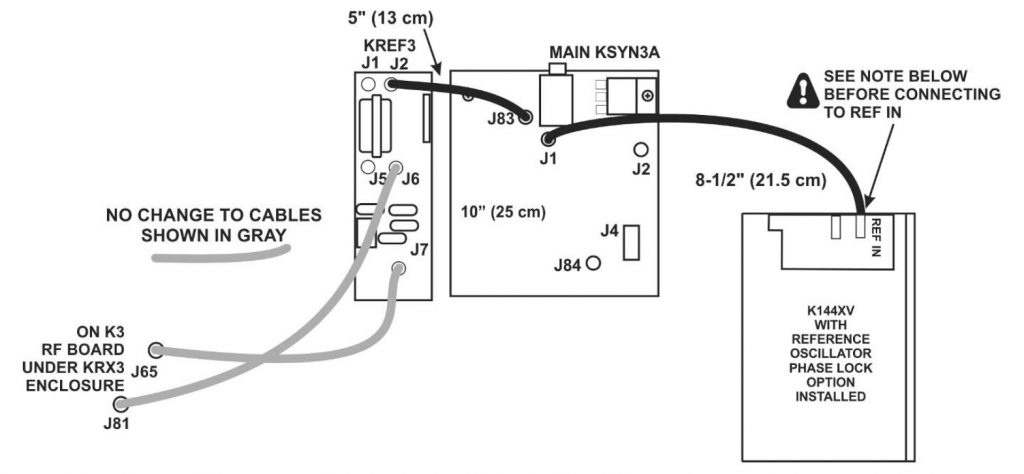
Ah Ha ! It seems that when I installed the KSYN3A upgrade I didn’t wire the K144XV module correctly. What I had done is connect the K144XV reference to J1 on KREF3 not J1 on KSYN3A. Damn !

The worst part is this wiring mistake appeared “to work” but it had instead introduced an intermittent fault where the reference output is loaded by the K144XV to the point the signal was marginal and the KSYN3A faulted.

So I have moved the cables to the right locations now and so far over the past 4 hours the radio has not faulted. Only time will tell if I have this intermittent fault nailed. I guess going to another contest will be the acid test. Oh wait there’s one of them on right now, so it’s time to fire this radio up for the John Moyle Memorial Field Day (JMMFD) and see what happens.

GPSd and the HP un2420

At a recent radio club technical night we ran through the setup of ntpd and GPSd for time syncing laptops. This is important when running modes like FT8 and JT65 where transmissions are synchronised to the nearest second, or for satellite tracking.

Picture of HP2420 Modem

During the tech night we used a external USB GPS, however my laptop has a HP un2420 broadband modem inside that includes a built in GPS. So after the tech night I decided to see if I could get GPSd to work with this module.

In a previous post I found that you could send a string to the last of three USB serial ports that this module creates [ttyUSB0-2], that would then activate the GPS functions within the module you can read this here (click).

So to use this module we need GPSd to send a “\$GPS_START” string to the GPS before it tries to use it. It also needs to send a “\$GPS_STOP” string to the GPS when GPSd stops.

It turns out GPSd has internal mechanisms to do this via a device-hook that you can find in the man page, however there aren’t many examples of “how” to do this on the internet.

The device hook file is nothing more than a simple bash script that is called by GPSd as it starts or stops the GPSd service. It will call this bash script using two parameters, the first is the name of the device, the second is the action required i.e.”activated” or “deactivated”. So all we need is a basic script, there are probably more elegant ways to write this script than what I’ve used, but it works for me.

So using your favourite editor create the file below with the following contents;

/etc/gpsd/device-hook

#!/bin/bash
#
#device hook script to start and stop HP2420 internal GPS
#
if [ "$1" = "/dev/ttyUSB2" ] && [ "$2" = "ACTIVATE" ];
then
echo "\$GPS_START" > "/dev/ttyUSB2"
sleep 5
else
if [ "$1" = "/dev/ttyUSB2" ] && [ "$2" = "DEACTIVATE" ];
then
echo "\$GPS_STOP" > "/dev/ttyUSB2"
fi
fi

This script simply matches the USB serial device the HP un2420 creates with the word ACTIVATE and fires the magic string into the USB serial device and will return 0 to GPSd. The same happens when GPSd wishes to stop the GPS device. These internal GPS devices do not like starting then immediately stopping, it can bork the device to the point it requires the laptop to be rebooted. So to prevent this a short sleep delay has been added just after we activate the GPS. I could have equally added it after or before the STOP command, but this might not be a good idea as laptops have a tendency to hibernate and we would like the GPS to stop.

Now that we have our script we need to make sure it’s executable by GPSd. I found that if you start GPSd and don’t let it daemonise for debugging, it will tell you which user and group that it starts with, we just need to make our permissions match;

$ sudo gpsd -N -D3 -F /var/run/gpsd.sock /dev/ttyUSB2
gpsd:INFO: launching (Version 3.17)
gpsd:INFO: listening on port gpsd
gpsd:INFO: stashing device /dev/ttyUSB2 at slot 0
gpsd:INFO: running with effective group ID 20
gpsd:INFO: running with effective user ID 122

gpsd:INFO: startup at 2019-03-07T23:52:07.000Z (1552002727)

I’ve highlighted the two lines we’re looking for. We can go and match these ID numbers to the specific user and group in the /etc directory. If you press Ctrl-C then GPSd will stop. Looking at the ID’s on my laptop this was user ‘gpsd’ and group ‘dialout’, YMMV.

So now we can set the right owner and permissions for our device-hook file;

$ sudo chown root:dialout /etc/gpsd/device-hook
$ sudo chmod 750 /etc/gpsd/device-hook
$ ls
legend@HP-ProBook:/etc/gpsd$ ls -al
total 20
drwxr-xr-x   2 root root     4096 Mar  8 09:54 .
drwxr-xr-x 130 root root    12288 Mar  8 00:06 ..
-rwxr-x---   1 root dialout   280 Mar  8 09:54 device-hook

Basically owner is left as root and we’ve given read and execute permissions to group dialout. This will allow GPSd to read the file and only sudo users able to edit it.

So using the same command line as before start GPSd in a window. Now in a second window launch a client like cgps. In the GPSd window we should see something like this;

legend@HP-ProBook:$ sudo gpsd -N -D3 -F /var/run/gpsd.sock /dev/ttyUSB2
gpsd:INFO: launching (Version 3.17)
gpsd:INFO: listening on port gpsd
gpsd:INFO: stashing device /dev/ttyUSB2 at slot 0
gpsd:INFO: running with effective group ID 20
gpsd:INFO: running with effective user ID 122
gpsd:INFO: startup at 2019-03-07T23:52:07.000Z (1552002727)
gpsd:CLIENT: => client(0): {"class":"VERSION","release":"3.17","rev":"3.17","proto_major":3,"proto_minor":12}\x0d\x0a
gpsd:CLIENT: <= client(0): ?WATCH={"enable":true,"json":true};\x0a
gpsd:INFO: running /etc/gpsd/device-hook /dev/ttyUSB2 ACTIVATE
gpsd:INFO: /etc/gpsd/device-hook returned 0

gpsd:INFO: SER: opening GPS data source type 3 at '/dev/ttyUSB2'
gpsd:INFO: SER: speed 9600, 8N1
gpsd:INFO: attempting USB device enumeration.
gpsd:INFO: 8087:0020 (bus 2, device 2)
gpsd:INFO: 1d6b:0002 (bus 2, device 1)
gpsd:INFO: 05c8:0403 (bus 1, device 4)
gpsd:INFO: 03f0:251d (bus 1, device 8)
gpsd:INFO: 8087:0020 (bus 1, device 2)
gpsd:INFO: 1d6b:0002 (bus 1, device 1)
gpsd:INFO: vendor/product match with 091e:0003 not found
gpsd:INFO: SER: speed 9600, 8O1
gpsd:INFO: SER: speed 9600, 8N1
gpsd:INFO: gpsd_activate(2): activated GPS (fd 8)

< BIG SNIP>

^Cgpsd:WARN: received terminating signal 2.
gpsd:INFO: closing GPS=/dev/ttyUSB2 (8)
gpsd:INFO: running /etc/gpsd/device-hook /dev/ttyUSB2 DEACTIVATE
gpsd:INFO: /etc/gpsd/device-hook returned 0

gpsd:WARN: exiting.

The two lines we need to find I’ve highlighted above. Basically we want to see GPSd execute our script with a return value of 0 (success). I’ve snipped a sizeable amount of information out of the above window to make it more readable. You should also see where I’ve hit Ctrl-C which generates a warning to cgps that GPSd has shutdown, which is neat !

Ok so now we have GPSd starting and stopping the GPS device in my laptop correctly. However this is not the end of the story, laptops are able to be suspended so we need to take care of this as well. So using your favourite editor create/edit the following file;

/etc/pm/sleep.d/96_gpsd

#!/bin/bash
#
# what we want done with our GPS in the laptop
case "$1" in
hibernate)
#stop GPSd
systemctl stop gpsd.socket
systemctl stop gpsd
;;
suspend)
#stop GPSd
systemctl stop gpsd.socket
systemctl stop gpsd
;;
restart)
#restart GPSd
systemctl restart gpsd
;;
esac

Thankfully as soon as we tell GPSd to stop it calls /etc/gpsd/device-hook and DEACTIVATES the GPS module for us. Now we also need to set the permissions correctly;

legend@HP-ProBook:/etc/pm/sleep.d$ chmod 755 96_gpsd
legend@HP-ProBook:/etc/pm/sleep.d$ ls -al
total 20
drwxr-xr-x 2 root root 4096 Mar  8 11:09 .
drwxr-xr-x 3 root root 4096 Apr 27  2018 ..
-rwxr-xr-x 1 root root  273 Mar  8 11:09 96_gpsd

Testing of this script is as simple as calling it with the correct first parameter. Testing that our distros are calling this file is a little harder and may be the subject of yet another post. I’m thinking that I need to measure if there is a performance difference with the GPS running while hibernated or not, this sounds easy but will take many hours. Still pondering.

There we go, the internal GPS within the un2420 should now be available, it would be worth rebooting your machine to make sure everything is working well.

MoonSked and Ubuntu 18.04LTS

Recently I was indoctrinated into the world of 6m EME when a few club members and I decided to give it a try on something of a whim. With a bit of encouragement from Lance W7GJ we raided and cherry picked our way through a few fellow club members shacks and sheds and pieced together a “small” portable 6m EME station. You can read about the activation on our club website once it’s published (click). The picture below speaks volumes;

The moon at moon set (4am) with our 6m EME station – photo by Scott VK5TST

While looking at various Apps and trying to work out how this EME thing works, I discovered MoonSked written by David GM4JJJ.

At first glance it appeared to be a cross platform application that would help me plan and understand how this EME thing works without wasting too many late nights outside. What I liked most is I could run it on both Windows or Linux. My main computer in the shack still runs Windows (for reasons), however for laptop(s) and servers I prefer various flavours of Linux. So the installation of MoonSked on my main shack computer was straight forward, however things rapidly fell apart when I tried the same on my Laptop that runs Ubuntu 18.04LTS. I downloaded the zip file, placed it in my home directory and then tried to run it, sigh it didn’t work.

After a quick check of the website I noticed the last version of Ubuntu that MoonSked was built to run on was 9.10 (karmic koala) which went end of life years ago (2013). Being a binary distribution means recompiling and linking this against 64-bit libraries was not an option, sigh; we had to do this the old fashioned hard way.

So having grown up using Linux for more years than I’d care to admit I had a fair idea that this would be the classic “shared library dependency problem”. I wasn’t to be disappointed and even learnt a little about how the new linux multiarch (well new to me) system worked.

So the crux of the problem was MoonSked was compiled against 32-bit binary libraries and my Ubuntu 18.04LTS distro is entirely 64-bit. It is little wonder that MoonSked couldn’t run. So the place to start with any dependency problem is the infamous ‘ldd utility’. Let’s poke inside MoonSked and see what libraries are under the hood;

legend@HP-ShackBook:~/MoonSked$ ldd MoonSked
linux-gate.so.1 (0xf7f48000)
libgtk-x11-2.0.so.0 => not found
libgdk-x11-2.0.so.0 => not found
libgmodule-2.0.so.0 => not found
libglib-2.0.so.0 => not found
libgthread-2.0.so.0 => not found
libgobject-2.0.so.0 => not found
libgdk_pixbuf-2.0.so.0 => not found
libpango-1.0.so.0 => not found
libpangocairo-1.0.so.0 => not found
libpangoft2-1.0.so.0 => not found

libpthread.so.0 => /lib32/libpthread.so.0 (0xf7f07000)
libdl.so.2 => /lib32/libdl.so.2 (0xf7f02000)
libXi.so.6 => not found
libXext.so.6 => not found
libX11.so.6 => not found

libstdc++.so.6 => /usr/lib32/libstdc++.so.6 (0xf7d7c000)
libm.so.6 => /lib32/libm.so.6 (0xf7cb1000)
libgcc_s.so.1 => /usr/lib32/libgcc_s.so.1 (0xf7c93000)
libc.so.6 => /lib32/libc.so.6 (0xf7aba000)
/lib/ld-linux.so.2 (0xf7f4a000)
libcairo.so.2 => not found

Ok so there are a few libraries missing and thankfully I can see some of the lib32 libraries are being found. What is not immediately apparent is that 32-bit libraries can be installed separately and sit alongside the very same 64-bit libraries. The multiarch features of the latest linux kernel and GNU tools is what confuses MoonSked trying to find it’s libraries. So to get MoonSked we need to solve the shared library dependencies separately. So watch the following carefully.

We start by double checking that we are in fact running a full 64-bit system;

legend@HP-ShackBook:~/MoonSked$ uname -m
x86_64
legend@HP-ShackBook:~/MoonSked$ dpkg --print-architecture
amd64

Excellent the kernel is 64-bit and we are using the 64-bit package repository that should be linked against 64-bit libraries. Now we check the following;

expert@HP-ShackBook:~/MoonSked$ dpkg --print-foreign-architectures
i386

Ah Ha ! This is excellent as it means that we can install the 32-bit libraries with the dpkg/apt tools without having to configure dpkg. If you find that i386 isn’t defined as a foreign architecture you’ll need to use dpkg to enable it. There are plenty of websites on the net that can assist here (YMMV), Ubuntu 18.04LTS comes pre-configured for 32-bit and 64-bit multiarch out of the box.

So now we can simply use apt-get to install the dependencies. I simply use a process of elimination to work out what is missing. First I’d use apt-cache and the name of the shared lib to search for library names or resort to the internet, then I’d use apt-get to install it and then re-run ldd again to see the result. The following line works well when the output from ‘ldd’ gets more than a page or two;

$ ldd MoonSked | grep "not found"

This will basically print out any library dependency that was not found to the display. Slowly but surely you work your way through to the end of your list, making notes as you go for your blog (*grin*). Rather than document all of the above steps I’ll just give you the short list;

sudo apt-get install libc6:i386 libpango-1.0:i386 libcairo2:i386 libpangocairo-1.0:i386 libgtk2.0-0:i386 libcanberra-gtk-module:i386 libatk-adaptor:i386 gtk2-engines-murrine:i386 libdlm3:i386

Now the observant will notice at the end of each package is a colon and i386. This tells apt/dpkg to install the 32-bit library and not the default 64-bit package. Depending on what apps you have on your linux machine already some of these packages may already be installed and up to date. If you do find this is the case then simply drop the name off the list above and keep trying.

As I wrote at the very beginning of this post, these are the steps that worked for me on my Ubuntu 18.04LTS installation. I’m hoping that the process used to seek and destroy the missing dependencies makes sense it’s certainly not the only way to do it, works for me YMMV.

At least now I can fire up MoonSked on Ubuntu 18.04LTS and continue my 6m EME experiments. Thanks again to David GM4JJJ for writing MoonSked !