HAB Telemetry – Design & Evolution

In a recent post I wrote about experiments with a Pine A64 running the Project Horus 4FSK binary and Wenet decoders. The next steps were to work out exactly I was going to build.

Systems Diagram

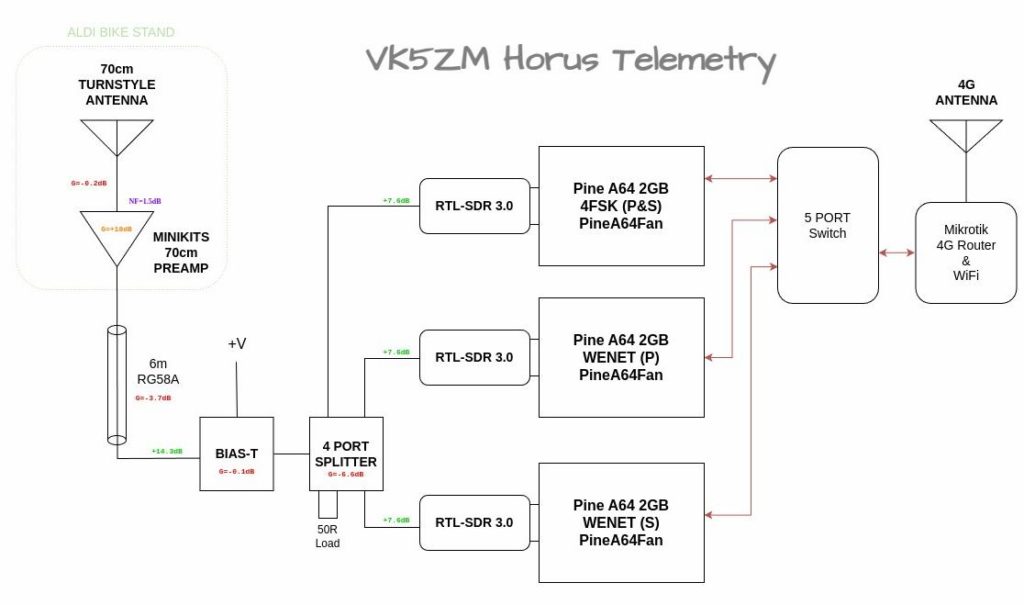
Designing systems is an iterative process, you start with an idea and then modify and adapt as pieces are found and problems are solved. From the outset I wanted to build a HAB Telemetry system that could track the majority of telemetry that the Project Horus Balloon flew, this being the primary and secondary 4FSK binary telemetry and Wenet. There are times when primary and secondary Wenet systems are also flown, so allowances for two Wenet decoders were made.

I wanted this system in a box, that I could take out of the car, place on a table, switch on and magically decode the telemetry from the Balloon. Having everything setup, configured and running, before going into the field, means that less time is lost debugging faulty cables, forgetting where and how to plug things together or worse still chasing down rogue software updates.

A picture speaks a thousand words, so below is a block diagram of what I proposed to build, that would suit my needs above. This was a culmination of the equipment I found rummaging around in my shed, rediscovering more treasures and realising I had only two Pine A64’s and needed three.
Design Evolution

The first “prototype” system was thrown together for the Horus 58 flight, which consisted of the two Pine A64’s I had, some RTL-SDR’s and some Mikrotik routers to get the data out and onto the internet. Here you can see some “design for but not with”, where I’ve left a space for a third Pine A64 that I was yet to find.
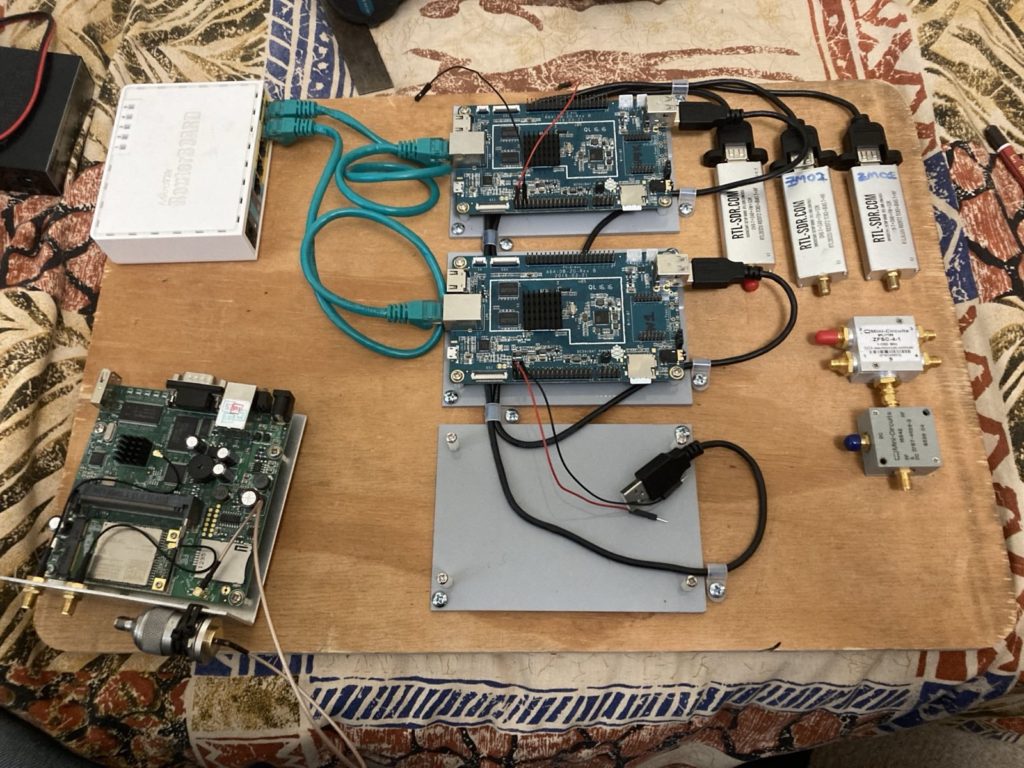
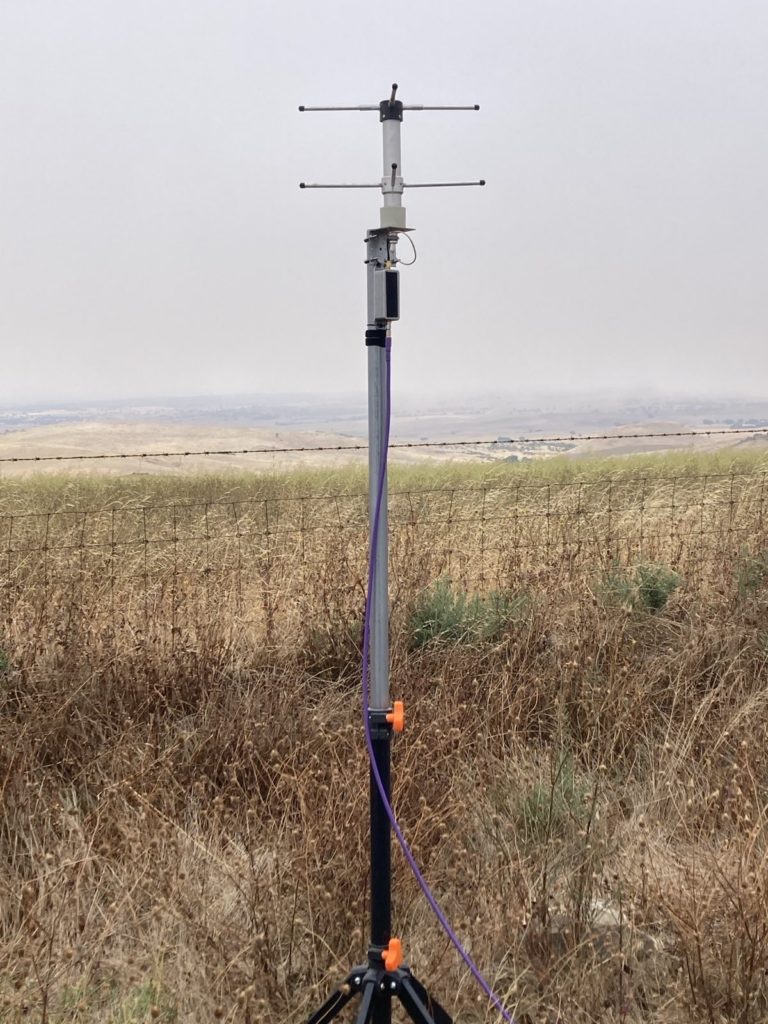
On this “first” flight I was rushed for time and didn’t have time to sort out an antenna. I usually track balloons with Peter VK5KX, so I was intending to plug my box into his beam, but due to leaving a RF adapter behind, I instead used a separate 70cm Turn Style antenna mounted to the side of Peters car. Both Peter and I were surprised just how well this simple antenna worked, so the whole idea of a Turn Style antenna, remote mounted preamp sitting a top an Aldi Bike Stand was born. You can see this antenna system I built for the SHSSP 2023 flight below, again all from my junk box and rediscovered treasures.
Knowing that I needed another Pine A64, I reached out within my local radio club to see if any of these SBC’s might be languishing on other junk boxes. I’ll give a shout out to Josh VK4JNA who gifted me the third Pine A64 in the photo below. It too was the KickStarter model sporting 2GB of RAM and came with the optional WiFi interface.
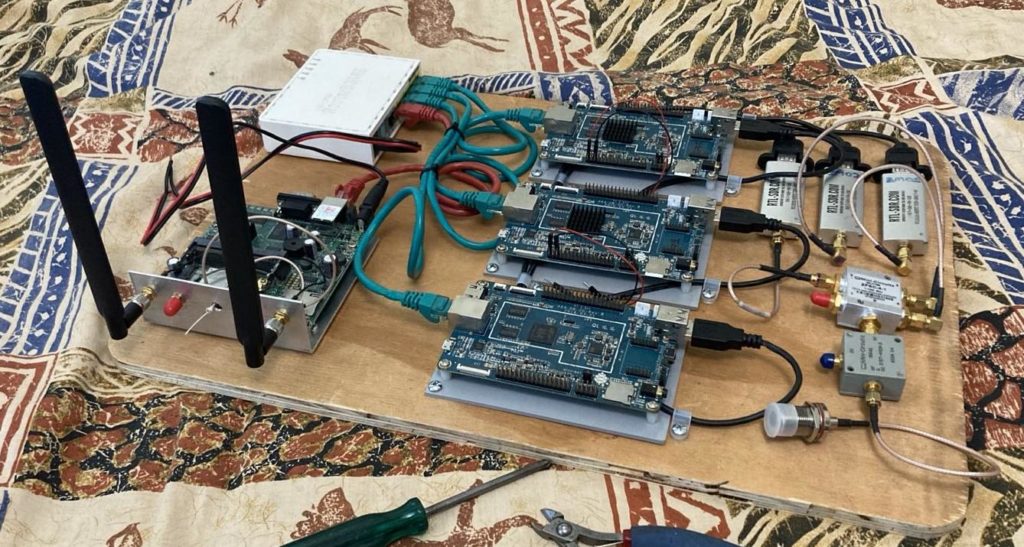
It was also during these first flights both Horus 58 and the SHSSP 2023, that after a period of time the software decoders would crash or lockup and stop responding. This wasn’t hard to find by placing ones finger on top of the processor, they were getting too hot and were thermally throttling the clock until the software maxed out the processor and crashed. This was more of a problem for Wenet systems than the 4FSK binary telemetry. Adding some stick on heat sinks didn’t improve things either, it just let them run for a further 10-15 minutes before crashing again. So it was from this that the PineA64Fan project was started, that added a separate software controllable Fan and a DC-DC converter. I’ll go into further detail about this fan controller and power supply in a later post, as it on it’s own has a great story to tell.

I was also thinking of how to power this unit in the field without purchasing a separate Lithium battery. I was watching YouTube one afternoon when I saw someone powering their 100W HF Radio from a Ryobi 19V battery using a DC-DC converter. What a great idea !!! When designing the PineA64Fan I used a DC-DC converter that matched the Mikrotik router input voltage range of 9-30V DC. This meant everything in the box would work nicely from from my 19V Makita batteries I have for my power tools that sit in the shed and are only used on weekends. With 90Wh of storage, this could easily power this entire box for the duration of a balloon flight, which is typically 4 hrs or less.

So below is the photo that finally realises the system diagram above.
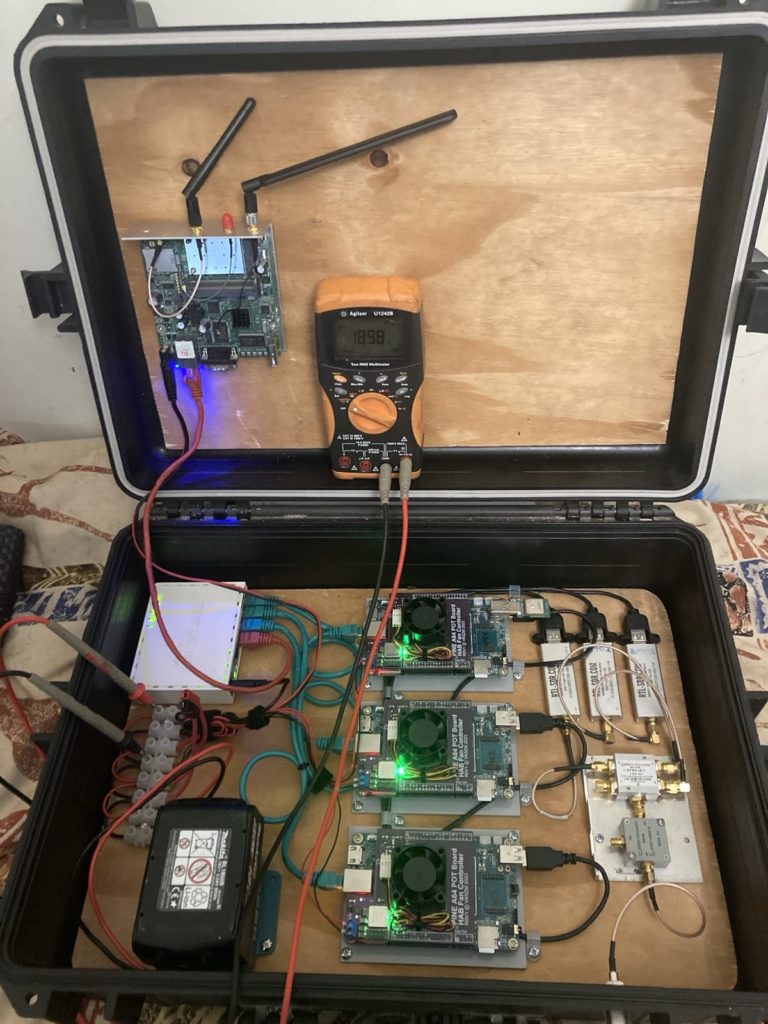
Here we have three Pine A64 SBC’s each with their own RTL-SDR. There are Mikrotik routers to connect the software decoders to the outside world and let them upload the data to the internet. All three Pine A64’s are rocking custom DC-DC converters and software controllable fans, that chime in and out as the processor temp gets above 50°C. As can be seen in the lower right of the case a Bias-T DC injector is used to power the LNA up by the antenna and the SDR’s are connected by a surplus 4-way splitter. Perfect, at least for now.

Next Steps

The system above was realised just before the Horus 60 flight in August of 2023. Which was a special event to celebrate the Amateur Radio Experimenters Group 25th Anniversary. For the eagle eyed reader, you may notice in the Bias-T wiring is not quite finished and that in the Horus 60 write up my callsign does not feature prominently in the logs.

I’ll continue this story and the reasons for the above however in a latter post…

HAB Telemetry – Initial Experiments

In a recent blog post I talked about finding some Pine A64 single board computers in a box and how this was the catalyst for my High Altitude Balloon (HAB) Telemetry experiments. In this post I continue describing the initial experiment with the Pine A64’s to test if they were capable of running the Project Horus software.

Pine A64 Operating System

So the choice of Linux operating system for the Pine A64 2GB SBC had grown substantially since the first time I experimented with these boards after the initial KickStarter campaign. After some trials and tribulations I settled on the DietPi distribution. This included a relatively modern kernel and a nifty installation and package management system, with a Debian based back-end. It is also highly optimised to run on small SBC’s, it only runs the bare minimum processes required and has logging to RAM enabled rather than to SDCard.

Setting up DietPi on this board was no different to any other ARM based SBC. Burning the image to SDCard, booting the device with a USB keyboard and monitor was straight forward. One nice part of DietPi is the setup and configuration is done within a Ncurses menu, similar to the raspberry Pi. So tuning and setting up the board just requires poking around these menus and configuring the hardware you want to use. Once done I found I was using just under 1GB of the 32GB SDCard I’d inserted, which included all of the GCC build tools I needed to compile programs from source. I was impressed.

Tracking Software and SDR’s

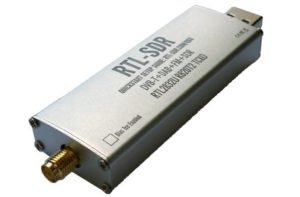
The first HAB tracking software I wanted to try was the Horus 4FSK binary telemetry. The Project Horus software team have done a great job documenting how to build and run this software in their GitHub wiki. The Horus guide recommends the RTL-SDR if you intend to run a Headless Raspberry Pi and I had a draw full of them left over from various projects. If you’re not familiar with these you can find them here, please be aware of fakes on eBay the frequency stability of these fakes typically results in tears. I’ve used the RTL-SDR V3 as pictured above.

It didn’t take me more than an hour to get this software running which included building the RTL-SDR software from source, editing the startup scripts and testing that dual 4FSK de-modulators were running. I was lucky to have a RS41 radio sonde that had been modified to generate this data mode, more detail can be found here. I was thankful that the DietPi distribution is very similar to the current Raspberry Pi platform, so all commands simply worked, those that didn’t required nothing more than installing the missing package or dependency and trying again.

Running both Horus 4FSK binary telemetry decoders on DietPi saw the system peak load get no higher than 0.6 (~15%), considering that the Pine A64 is a quad core 1.2GHz ARM, this is very lightly loaded. There is definitely more scope to add further functionality on this SBC.

So having cloned the SDCard just prior to installing the Horus 4FSK binary telemetry software, I then started again a fresh on the second Pine A64 and installed the Wenet software. Again the installation documentation for Wenet is excellent and I chose to go the Docker path rather than build from source. This time however the system peak load, rose to 1.6 and peaked no higher than 2.5 (~63%), meaning a single Docker Wenet decoder is about as much as I was confident loading this system with using a RTL-SDR.

Next Steps

So based on the above experiments, it was clear the Pine A64’s that spent the better part of 5 or more years languishing in my shed were more than capable of tracking HAB balloons and would finally be pressed into service.

As hinted within the Project Horus documentation there is more than just software required to track High Altitude Balloons. It was time to continue digging through that shed to find more treasures for this new project.

That however will need to wait for the next post, more to follow.

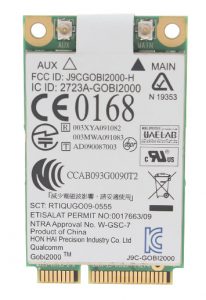
HP Cellular Modem for HP 5320m

After pulling the bottom cover off my second-hand HP Probook 5320m a couple of times I was pleased to discover a PCI-E slot for a HP un2420 mobile broadband modem.  It appears that the Cellular antennas are already built within the lid (or screen) of the laptop.   A light bit of reading also suggested that these modules were capable of decoding GPS signals too.

I just had to try one.

So for the princely sum of $35 I procured a HP un2420 Gobi 2000 module from a local eBay seller.  There are suppliers on eBay that are selling these HP Gobi 2000 modems out of China for $11, which is an absolute bargain. YMMV.  I didn’t want to wait until after Christmas to try one so I purchased one at the higher price.

Now of course I want this to work in my shiny new Ubuntu 16.04 LTS laptop.  Oh well I’ve always welcomed a challenge.   I’ll detail the steps I took to get to a working solution.

First we should check we can see the module;

#$ lsusb
Bus 002 Device 002: ID 8087:0020 Intel Corp. Integrated Rate Matching Hub
Bus 002 Device 001: ID 1d6b:0002 Linux Foundation 2.0 root hub
Bus 001 Device 004: ID 05c8:0403 Cheng Uei Precision Industry Co., Ltd Webcam
Bus 001 Device 003: ID 03f0:241d Hewlett-Packard Gobi 2000 Wireless Modem
Bus 001 Device 002: ID 8087:0020 Intel Corp. Integrated Rate Matching Hub
Bus 001 Device 001: ID 1d6b:0002 Linux Foundation 2.0 root hub

I’ve highlight what we’re looking for (in blue) which is the “HP Gobi 2000 wireless modem”.  You can tell that this device is currently un-programmed as the product ID is “241d” and changes to “251d” once the firmware is loaded.   You also need to check that /dev/ttyUSB0 exists and that your user that starts the 3G cellular modem is in group dialout.  This isn’t necessary right now but does simplifies things later.

Now you’re going to require a Microsoft Windows machine, sorry there is no other easy way around this.  Some have managed to pull apart MSI files in wine, I didn’t get that lucky.  The Qualcomm Gobi modems down load the firmware into the modem at power on, once the firmware has been download the modems will work.   I was lucky to have the same laptop with Windows 10 installed, so I simply installed the driver on this second machine and then stole the files I needed on a USB stick.  I had to install the un2420 module in the Windows machine to get the drivers to load.

From within the Windows driver there are two directories from which we need three files;

  • ….\Qualcomm\Images\HP\UMTS\amss.mbn
  • ….\Qualcomm\Images\HP\UMTS\apps.mbn
  • ….\Qualcomm\Images\HP\6\uqcn.mbn

You’ll need to work out where the drivers get placed depending on your version of windows, it will be installed in the program directories there somewhere.  I found them in the Program Files (x86) directory on Windows 10.   The files above are what you require for a Generic UMTS modem (6) that is not vendor network specific or locked.  This worked nicely for my unlocked module and Telstra pre-paid SIM. YMMV.

Now once you have these files on a USB stick you can start work on the Linux machine.

#$ sudo apt-get install gobi-loader

This will get the udev helper we need to load the firmware into the modem.  Once this is installed copy the files from the windows machine into this directory, watching file permissions of course;

#$ sudo cp /mnt/usbstick/* /lib/firmware/gobi

As mentioned we want all three “mbn” files above in that directory.  Now you might like to check that the udev rules for QDL modems are correct in the following file;

#$ less /lib/udev/rules.d/77-mm-qdl-device-blacklist.rules

Your looking to check that the following two lines exist;

#HP un2420 Gobi QDL Device
ATTRS{idVendor}=="03f0", ATTRS{idProduct}=='241d", \ ENV{ID_MM_DEVICE_IGNORE}="1"

These lines will prevent ModemManager in Ubuntu from trying to take control of this device at boot up before the udev helper gobi_loader gets a change to load the firmware.   Now if all is going well reboot the machine and then check the following in a terminal;

#$ lsusb
Bus 002 Device 002: ID 8087:0020 Intel Corp. Integrated Rate Matching Hub
Bus 002 Device 001: ID 1d6b:0002 Linux Foundation 2.0 root hub
Bus 001 Device 004: ID 05c8:0403 Cheng Uei Precision Industry Co., Ltd Webcam
Bus 001 Device 003: ID 03f0:251d Hewlett-Packard Gobi 2000 Wireless Modem
Bus 001 Device 002: ID 8087:0020 Intel Corp. Integrated Rate Matching Hub
Bus 001 Device 001: ID 1d6b:0002 Linux Foundation 2.0 root hub

You should notice that the product ID has changed from 241d to 251d, meaning that firmware is now loaded in the 3G modem.  I tried not rebooting this machine which turned out to be a mistake.  ModemManager is a pernickety piece of software that won’t do anything unless everything is 100% right.  I wasted a number of hours chasing my tail trying to get services shutdown and restarting stuff.

You should also see that there are now three tty USB devices attached to the system;

#$ ls /dev/ttyUSB*
/dev/ttyUSB0 /dev/ttyUSB1 /dev/ttyUSB2

If you don’t see these three devices then there is something wrong.  I’d suggest you start with dmesg and searching your way through syslog to find out why what’s gone wrong.  It can take a while.  When you do get things right about 13-15 seconds after the kernel loads you should see the firmware loaded into the modem and the additional USB serial ports being created.   If the firmware doesn’t load you will find error messages in syslog.

Now you should be able to configure the NetworkManager to actually use the Modem.  I simply went into NetworkManager -> Edit Connections and created a mobile broadband connection from scratch.   The APN we want to use for Telstra is “telstra.internet” and the rest is pretty much a vanilla install.

Once you’ve got the connection, done you should be able to connect to the internet via the cellular modem.

Oh and don’t forget to plug your SIM into the slot in the battery case.   Now you can sit back and enjoy Cellular Mobile data without any external USB dongle to snap off, or get left behind.

Yay !