After having configured a Color Kinetics RGB LED driver I need a way to generate a DMX stream to validate it worked as expected. I searched my project boxes for some RS485 USB interfaces in my workshop, but as usual I had put them in a “special” place. So there was nothing for it but to crack out an Arduino and the soldering iron.
This isn’t the first RS485 interface I’ve built for an Arduino, but if you haven’t done it for DMX then I suggest reading this article on Instructables (click) that explains why the standard RS485 shields available are not suitable. However this interface (click) is one that I have found to work, just note that the TX and RX should be Pins 1 & 0 respectively and the enable input (ENB) should be connected to Pin 2.

I like to use the Freetronics Basic Protoshields when building with Arduino’s they are different around the connectors and seem to have more clearance. The photo of the interface (right) was taken just prior to the RS485 safety resistors being mounted across the output of the RS485 bus.
I’d caution anyone against building RS485 interfaces without these safety resistors. With new RS485 receivers you can get away with out using them, but with older receivers they are mandatory. In a nutshell the safety resistors ensure there is always a 200mV differential across the receiver input that ensures the output of the receiver sits in the “UART idle” state. Otherwise what you find is the receiver will either not toggle it’s output or oscillate, in either case it doesn’t work. You just never know if the device you’re talking too has an old or new receiver, so it’s safer (boom boom) to have them than to not. YMMV.
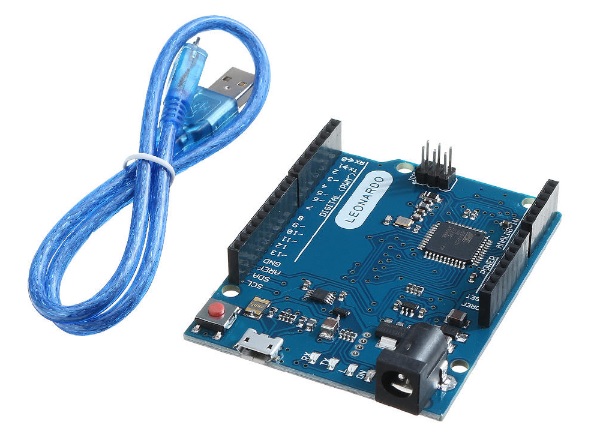
Once the basic interface was built I then realised that this wasn’t going to work with your standard Arduino Uno. You can’t share the UART with both the USB programming and serial debug interface with the RS485 driver without their being bus contention problems, steering resistors can be used with varying success. So the simple solution to this problem was to switch to a Arduino Leonardo, since they have both an on-chip USB interface for debugging and programming and a separate UART connected to pins 0 and 1. This was not without it’s own problems, so much so there is separate blog post to deal with these (click).
So all that was missing was a DMX library. Now this is something of a mine field, there are so many DMX libraries it got confusing finding the right one. After a lot of searching, downloading and fiddling I settled on the “DMX Library for Arduino” written by William van der Meeren (click). What set this library apart was it would transmit a full DMX 512 byte frame every 26ms from a much smaller buffer held in RAM that was non-blocking. It also has a mechanism to signal to the main loop when it had finished a full frame (click) allowing the firmware to quickly update the DMX channels and then allow it to carry on. This meant that colour washes could be kept atomic and smooth.
Below is one of the test programs that I wrote using the DMX library to test a few ideas on what may be possible with this interface. I have also included the PlatformIO config file that includes the necessary build flags;
#include <Arduino.h>
#include "Conceptinetics.h"
#include "math.h"

#define debug_output_enable()	Serial.begin(115200); while (!Serial){}
#define debug_output_f(...)    	Serial.print(F(__VA_ARGS__))
#define debug_msg_f(...) 	Serial.println(F(__VA_ARGS__))
#define debug_output(...)      	Serial.print(__VA_ARGS__)
#define debug_msg(...) 	      	Serial.println(__VA_ARGS__)

// structure to hold RGB colour information
typedef struct
{
  uint8_t red;
  uint8_t green;
  uint8_t blue;
} mycolour_t;

// DMX addressing information
const uint8_t DMX_DEVICES = 6;
const uint8_t DMX_CHANNELS_PER_DEVICE = 3;
const uint8_t DMX_CHANNELS_MIN = 1;
const uint8_t DMX_CHANNELS_MAX = (DMX_DEVICES*DMX_CHANNELS_PER_DEVICE);
const uint8_t DMX_BREAK_USEC = 200;
const uint8_t DMX_TXRX_PIN = 2;       // pin 2 used for RS485 TX/RX pin

// setup DMX master control object
DMX_Master dmx_master( DMX_CHANNELS_MAX , DMX_TXRX_PIN );

// convert sine wave to half wave, clamp value to zero for non-negative
// sine ouptut
float non_negative( float degrees )
{
  if( sin( degrees * DEG_TO_RAD ) < 0.0 )
    return 0.0;
  else
    return degrees;
};

// Initialise our hardware
void setup( void )
{
  /* Leonardo has separate USB serial port which is enabled when
     plugged in.
  */
  debug_output_enable();

  // display something to user when deubgging
  debug_output_f("Mallee DMX Test\r\n Initialising...");

  // setup our DMX master
  dmx_master.enable();
  dmx_master.setChannelRange( DMX_CHANNELS_MIN, DMX_CHANNELS_MAX, 0 );
  dmx_master.setManualBreakMode();
  debug_msg_f(" Done!");

  // all done
  return;
}

// our main loop that will do stuff
void loop( void )
{
  /* Check if the DMX master is waiting for a break to happen,
     the function below runs every 26ms (44Hz) which is the DMX
     maximum frame rate.
  */
  if( dmx_master.waitingBreak() )
  {
    // Temp storage for RGB information
    mycolour_t colour;

    // local count variable
    static float angle = 0.0;

    // how much we'll increment our counter per frame
    angle += 0.25;

    //if we overflow wrap back to zero
    if( angle > 360.0 )
      angle = 0.0;

    /* calculate out our RGB values, including our phase offsets;
       not a lookup table in sight !
    */
    colour.red = (uint8_t)( 255 * sin( non_negative(angle + 120.0) * \
                            DEG_TO_RAD) );
    colour.green = (uint8_t)( 255 * sin( non_negative(angle + 0.0) * \
                              DEG_TO_RAD) );
    colour.blue = (uint8_t)( 255 * sin( non_negative(angle + 240.0) * \
                             DEG_TO_RAD) );

    /* Now we can update all of the attached devices, note that the DMX
       channels and the lamps are configured by the Color Kinetics
       QuickPro software separately.
    */
    for( uint8_t i = 0; i < DMX_DEVICES; i++ )
    {
      //calculate DMX address for each lamp device
      uint8_t addr = (i * DMX_CHANNELS_PER_DEVICE) + DMX_CHANNELS_MIN;

      //update individual channels are sequentially addressed
      dmx_master.setChannelValue(addr+0, colour.red );
      dmx_master.setChannelValue(addr+1, colour.green );
      dmx_master.setChannelValue(addr+2, colour.blue );
    }

    // Generate break and continue transmitting the next frame
    dmx_master.breakAndContinue ( DMX_BREAK_USEC );
  }
}
;PlatformIO Project Configuration File
;
;   Build options: build flags, source filter
;   Upload options: custom upload port, speed and extra flags
;   Library options: dependencies, extra library storages
;   Advanced options: extra scripting
;
; Please visit documentation for the other options and examples
; https://docs.platformio.org/page/projectconf.html
[env:leonardo]
platform = atmelavr
board = leonardo
framework = arduino
monitor_speed = 115200
build_flags =
  -D USE_DMX_SERIAL_1
  -D __DEBUG_ENABLED__